The QuickBooks name is synonymous with quality and reliability when it comes to accounting software. However, even the most well-designed program can encounter occasional glitches. That’s where the QuickBooks Tool Hub comes in. This essential tool helps users troubleshoot and repair common problems with QuickBooks.
What is QuickBooks Tool Hub and What Does It Do?
| Software Name | QuickBooks Tool Hub |
| Developer | Intuit |
| Category | Accounting |
| File Type | .exe |
| Supported OS | Windows |
QuickBooks Tool Hub is a very useful tool for any business that uses QuickBooks. It can save you a lot of time and money by solving problems yourself instead of waiting for customer support to resolve them. It is designed to help users troubleshoot and fix common QuickBooks issues.
The Tool Hub provides a range of tools for diagnosing and repairing QuickBooks problems, including the Quickbooks clean install tool, QuickBooks Install Diagnostic Tool, PDF & Print Repair Tool, Condense Data, QuickBooks Refresher, File Doctor, and much more.
What Errors Does QuickBooks Tool Hub Fix?
If you are a daily user of QuickBooks, then you must know about the head-scratching errors it comes with. Well, the QuickBooks tool hub is what you need. It can fix a lot of QuickBooks errors easily. Let’s check what errors can be rectified with the help of the Quickbooks tool hub.
| QuickBooks Error 6209, 0 | QuickBooks Error Code 80070057 | QB Unable to start Error |
| QB Payroll Error 2002 | Microsoft .NET Framework Errors | QuickBooks Crashing |
| QuickBooks Error 6150 | PDF and printing blunders | QB Error 1328 |
| H series (QB Error H202,H303) | QuickBooks Payroll Error | QuickBooks Error 6190,816 |
| 6000 series errors (Error 6000 77, 80) | QuickBooks Error 1706 | QuickBooks Company File Issue |
System Installation Requirements To Download QuickBooks Tool Hub
Before you can install QuickBooks Tool Hub, there are a few system requirements you’ll need to meet.
- Good internet connection
- Windows 7 or higher
- Microsoft Visual C++ – Redistributable package
- Recently released Microsoft .Net Framework
- At least 4 GB of RAM and 2 GB of free hard drive space
When you meet all of these requirements, then you are ready to install QuickBooks.
Steps to Download and Install QuickBooks Tool Hub
Before you start downloading, make sure that you establish a stable internet connection so that the process cannot get interrupted in between. Well, downloading is a super easy task to do. You just need to follow the below-written steps.
- Go to Intuit’s official website and download the latest version.
- Make sure you save it to an accessible location.
- Now, you are all set for the installation steps. Launch the QuickBooksToolHub.exe file to begin the installation process.
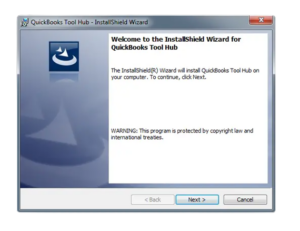
- Once done, select Next. You will be prompted to accept Intuit’s license agreement; click Yes.

- The folder where Tool Hub will be saved will be displayed on the screen. You can change the directory if you wish to.
- Click on the Install option. Once done, click on Finish,
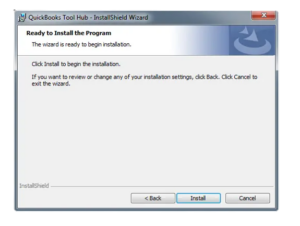
- Now, the repairing tool will appear.
After installing the QuickBooks Tool Hub, go to the Desktop. Click twice on the icon of the Tool Hub. In case you are unable to find the icon, you can also search in the Windows Search option. Simply type QuickBooks Tool Hub and select the program.
What Components Do You Get When You Open QuickBooks Tool Hub?
The QuickBooks Tool Hub is organized into tabs, each containing a different set of tools, each designed to help businesses resolve specific issues. Let’s go through the five different tabs of the Tool Hub in detail.
The Company-file issues Tab

Company-file issues are one of the most common problems that QuickBooks users face. Fortunately, QuickBooks File Doctor can help to resolve these issues quickly and easily. File Doctor is a tool that is integrated into the QuickBooks Tools Hub.
To use File Doctor, simply open the Tools Hub, select the company file, and then allow the tool to diagnose to resolve the ongoing data damage issues. In most cases, File Doctor will be able to successfully repair the damaged data and get your company file up and running again. The second tool is Quick to Fix My File, which can repair damaged or corrupted installation files.
The Network Issues Tab

The Network Issues tab in the QuickBooks Tool Hub can be used to resolve many common network errors, such as QB Error H505. To access this tab, open the QuickBooks Tool Hub on the server or system hosting the company file.
Once the QuickBooks Tool Hub is open, you will see the Network Issues tab on the left side of the window. Clicking on this tab will show you QuickBooks Database Server Manager, which can be used to diagnose and resolve any network issues that may be causing problems with your company file.
The Program Problems tab
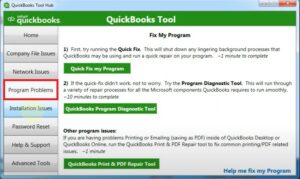
The QuickBooks Tool Hub Program Problems tab offers three ways to fix ongoing program-related issues. The first option is “Quick Fix my Program”, which shuts down processes that have been actively running in the background and attempts to resolve the issue.
The second option is the “QuickBooks Program Diagnostic Tool”. This tool will take around twenty minutes to diagnose and clear any issues. After resolving the program-related issues, you may need to reboot your computer. The third option is the “QuickBooks Print and PDF Repair Tool” through which you can fix emailing or printing PDF errors within the QuickBooks application.
The Installation Issues Tab
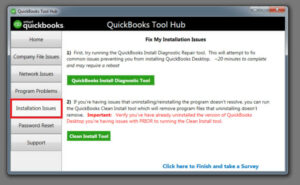
The Installation Issues tab contains the QuickBooks Install Diagnostic Tool, which can resolve common installation problems. If the QuickBooks Install Diagnostic Tool does not fix the issue, the Clean Install Tool can remove any program files that were not properly uninstalled.
The Password Reset Tab

This tab allows you to reset your password if you have forgotten it. To reset your password, you will need to answer a series of questions about your account. After you have answered these questions, you will be able to create a new password for your account.
How Businesses have Benefited From using QuickBooks Tool Hub?
QuickBooks Tool Hub is a toolkit developed to help businesses streamline their accounting processes. The toolkit includes a variety of QuickBooks-specific tools that have been helpful resources for businesses of all sizes, as it offers a wide range of features and tools that can be used to improve accounting efficiency.
For example, the QuickBooks File Doctor can be used to identify and fix problems with QuickBooks Company files, and the password reset tab can be used to reset forgotten passwords, making it easy to regain access to QuickBooks files.
In addition, the Tool Hub also includes a range of diagnostic tools that can help identify and resolve performance issues, network connectivity issues, and other common problems. As a result, QuickBooks Tool Hub has become an essential tool for businesses that rely on QuickBooks for their accounting and bookkeeping needs. Thanks to the Tool Hub, businesses are able to quickly and easily resolve a wide range of issues, resulting in increased productivity and fewer accounting errors.
Instruction For Using QuickBooks Tool Hub (Must Keep in Mind)
1. Get to know the QuickBooks Tool Hub
The first step is understanding the Tool Hub and what it can do for you. The QuickBooks Tool Hub is designed to help you fix common problems with your QuickBooks software. It’s a powerful tool that can save you time and frustration by helping you troubleshoot and repair common issues.
2. Download and install the QuickBooks Tool Hub
Once you know what the Tool Hub can do, it’s time to download and install it. You can find the QuickBooks Tool Hub on the Intuit website. Just scroll down to the “QuickBooks Tools Hub” section and click the “Download Quickbooks Tool hub” button.
3. Use the QuickBooks File Doctor
One of the most useful tools in the QuickBooks Tool Hub is the QuickBooks File Doctor. This tool can help you diagnose and repair common problems with your company file.
To use the File Doctor, just open the tool hub and click on “File Doctor.” Then, follow the prompts to select your company file and start the diagnosis process.
4. Run the QuickBooks Install Diagnostic Tool
Another helpful tool in the QuickBooks Tool Hub is the QuickBooks Install Diagnostic Tool. This tool can help you troubleshoot problems with the installation or upgrade of your QuickBooks software.
To use the Install Diagnostic Tool, just open the tool hub and go to the Installation Issues tab. Now click on “QuickBooks Install Diagnostic tool.” Then, follow the prompts to start scanning your system for installation issues.
Use the Clean Install Tool when you’re having trouble installing QuickBooks. The Clean Install Utility is designed to help you clean up your system before performing a fresh install of QuickBooks. This can be helpful if you’re experiencing errors during the installation process.
What to do when QuickBooks Tool Hub Suddenly Stops working?
QuickBooks Tool Hub can help you fix a lot of common QuickBooks problems. But sometimes, the QuickBooks Tool Hub suddenly stops working. Here are five things you can do if the QuickBooks Tool Hub stops working:
- Update QuickBooks: If the problem is due to an outdated version of the software, updating it should fix the issue. To update QuickBooks Tool Hub, simply launch the software and click on the “Help” menu. Then select “Update QuickBooks.”
- Restart your computer: Sometimes, a simple restart can fix a software issue. So try restarting your computer and see if that fixes the problem.
- Re-install QuickBooks Tool Hub: If restarting your computer doesn’t work, try re-installing QuickBooks Tool Hub. To do this, go to the Control Panel and uninstall QuickBooks Tool Hub. Then download and install the latest version from the website.
- Turn off your antivirus software temporarily: In some cases, your antivirus software can interfere with QuickBooks Tool Hub and cause it to stop working. So try turning off your antivirus software and see if that fixes the problem. If it does, you may need to add an exception for QuickBooks Tool Hub in your antivirus software’s settings.
- Use the Best Laptops for QuickBooks: At times, QuickBooks can encounter issues, so it is always wise to buy the best laptops for QuickBooks and make sure your accounting workflow is up and running without any delays.
- Contact Intuit support for assistance: If none of these solutions work, contact Intuit support for assistance. They can help you troubleshoot the problem and get QuickBooks Tool Hub working again.
Conclusion
QuickBooks Tool Hub is an incredible tool that can rectify your QuickBooks issues related to network and company files. These issues are quite hard to resolve as you won’t get their solutions anywhere on the internet. But with the QuickBooks tool hub, you can fix these issues in no time. For a safer experience, you must make sure you download the latest version from its original website. If you are still having any queries jumbling in your head, then you must connect with us anytime. Our Quickbooks experts are always ready to help you 24/7.
Frequently Asked Questions
Q1. Is QuickBooks Tool Hub free?
QuickBooks tool hub is free to use and more often used to rectify network issues related to the company files. It can help to rectify these small issues in no time and without charging any associated fees for rectification.
Q2. Where is the tool hub on the QuickBooks desktop?
Once you are done with the download of the QuickBooks tool hub, you can simply get the icon on your desktop. If you are not getting on the desktop, you must search for it in the Windows search option. Simply type QuickBooks Tool hub and click the matched result.
Q3. Is QuickBooks Desktop being phased out in 2023?
Yes, it is going to be phased out by May 2023. As the new release confirms, The support will be discontinued and will be going to affect all the QuickBooks versions.
Q4. How much is a QuickBooks 2024 subscription?
QuickBooks 2024 subscription will cost you around 549 dollars for a pro plus annual subscription. Moreover, it can be come up with some additional tax as well.
Q5. How many users can be on QuickBooks at once?
This will depend on what plan you have chosen and paid for. A simple start plan will allow only a single user at a time. Online essentials plan will allow only. 3 Billable users and 1 accountant at a time. Moreover, the online Plus plan will allow 5 users at a time and 1 accountant.
Q6. What are tools you can use to identify possible issues in QuickBooks?
There are various tools to identify the issue; the most commonly used and the most efficient working tool is transaction journal and audit log.
Q7. What is the most useful QuickBooks function?
Invoicing is the most common and useful function performed by QuickBooks. Most people purchase its plan because they want to have an automated invoicing option.
Q.8 How do I do a clean install of QuickBooks?
Click the QuickBooks Tools Hub icon from your computer’s desktop. select Installation Issues and click Clean Install Tool. Choose the QuickBooks desktop version and select Continue. Once the “Please install your copy of QuickBooks to the default location” message appears on the screen click OK.erro4