QuickBooks Online is a widely popular cloud-based accounting software that helps small businesses manage their finances. However, not all businesses may find it useful or cost-effective in the long run. In such cases, it becomes essential to cancel your QuickBooks Online subscription. But cancel QuickBooks Online can be a daunting task for some users. In this article, we’ll guide you through the process of canceling QuickBooks Online, step by step.
Reasons to Cancel QuickBooks Online
There could be several reasons why you may want to cancel QuickBooks Online subscription. Some of these reasons may include:
- Dissatisfaction with the software’s features or functionality.
- You found a more cost-effective or better-suited accounting software for your business.
- You no longer require the software’s services.
- You are closing down your business.
Pre-Cancellation Checklist
Before you cancel QuickBooks Online subscription, make sure to complete the following tasks:
- Make a backup of your QuickBooks Online data to avoid losing any important financial data.
- Export your data to a format that is compatible with other accounting software if you plan to migrate your financial data to new software.
- Clear all outstanding invoices or payments, if any, to ensure that you don’t get charged after a cancellation.
How to Cancel QuickBooks Online Subscription
CancelQuickBooks Online subscription is a simple process that can be completed in a few steps. Here’s how:
1. Backup Your Data
As mentioned earlier, it’s essential to backup your data before cancelQuickBooks Online subscription. To backup your data, follow these steps:
- Log in to your QuickBooks Online account.
- Go to the “Gear” icon at the top right corner of your screen.
- Select “Export Data” from the drop-down menu.
- Choose the data you want to export and follow the on-screen instructions to complete the process.
2. Navigate to Your Account Settings
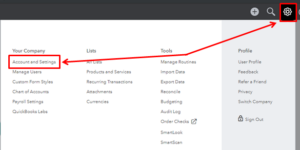
Once you have backed up your data, navigate to your account settings by following these steps:
- Please click the “Gear” icon located in the top right corner of your screen.
- Choose “Account and Settings” from the options presented in the dropdown menu.
3. Select the Billing & Subscription Tab
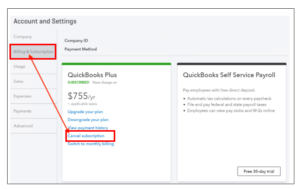
From the account settings page, select the “Billing & Subscription” tab from the left menu.
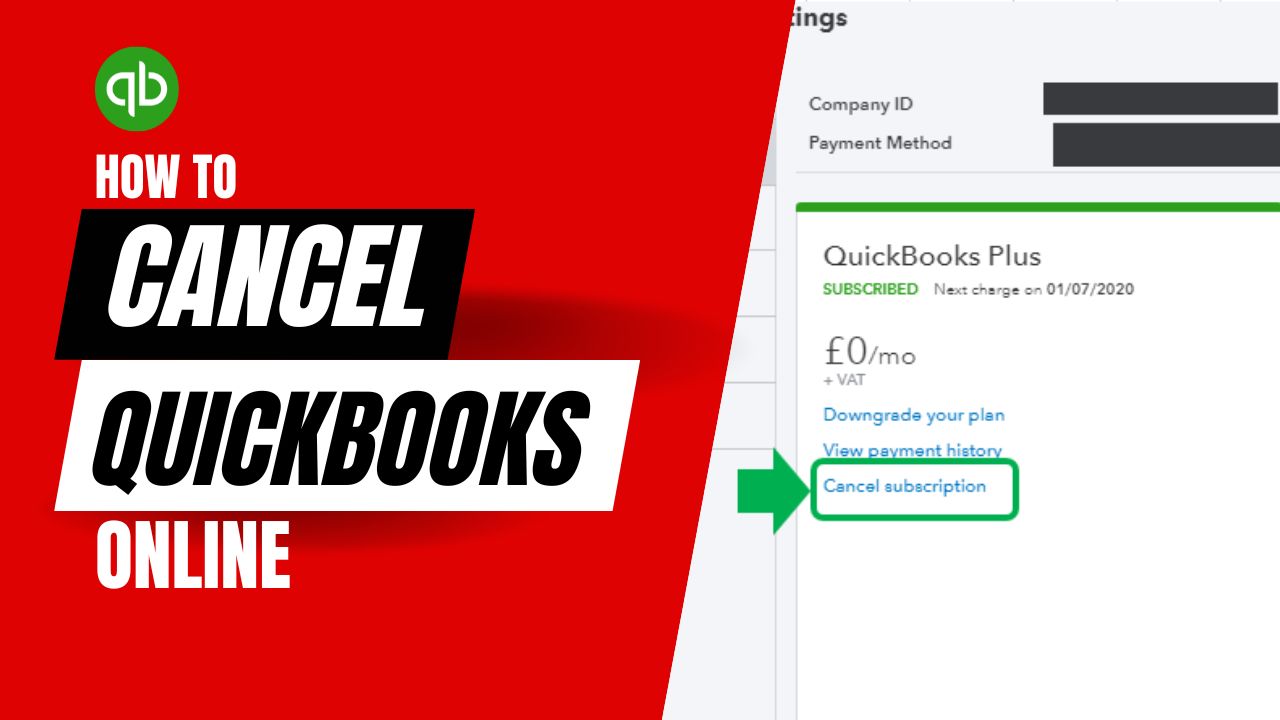
4. Choose Cancel Subscription
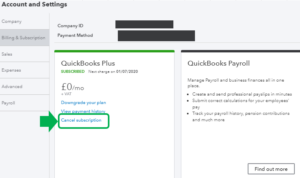
Under the Billing & Subscription tab, choose the “Cancel Subscription” option.
5. Provide a Reason for Cancellation
QuickBooks Online will prompt you to provide a reason for cancel QuickBooks Online subscription. Please select the option that most accurately describes your situation, using the English language.
6. Confirm Cancellation
After selecting a reason, QuickBooks Online will present you with some alternative options. If you still want to cancel QuickBooks Online subscription, select the “Continue to Cancel” button. You can confirm the cancellation by clicking on “Cancel Service”.
Confirming Your Cancellation
After completing the cancellation process, QuickBooks Online will send you an email confirming your cancellation and provide you with the date that your subscription will end. Make sure to keep this email for your records.
After Cancellation Checklist
After cancel QuickBooks Online subscription, make sure to complete the following tasks:
- Make sure to pay any outstanding balances to avoid additional charges.
- Export all your data to a compatible format if you plan to migrate your financial data to new software.
- Unsubscribe from any email notifications related to QuickBooks Online.
Conclusion
CancelQuickBooks Online subscription may seem daunting, but it’s a simple process that can be completed in a few steps. Before canceling, make sure to backup your data, pay any outstanding balances, and unsubscribe from any email notifications related to QuickBooks Online. Once you have canceled your subscription, you can export your data to a compatible format and reactivate your subscription if needed. If you’re unsure about canceling your QuickBooks Online subscription, contact their customer support team for assistance.
Frequently Asked Questions (FAQs)
Q1. What happens if I cancel my QuickBooks Online subscription before the end of my free trial period?
If you cancel QuickBooks Online subscription before the end of your free trial period, you won’t be charged any fees. However, keep in mind that you’ll lose access to the software once the trial period ends. If you’re not sure whether QuickBooks Online is right for you, it’s a good idea to take advantage of the free trial period to test it out. That way, you can make an informed decision about whether to continue using the software or explore other options.
Q2. Can I downgrade my QuickBooks Online subscription instead of canceling it?
Yes, you can downgrade QuickBooks Online subscription instead of canceling it if you no longer need the features of your current plan. To downgrade your subscription, log into your account and select the “Billing & Subscription” option. From there, choose the plan you want to switch to and follow the instructions. Keep in mind that downgrading your subscription may affect the availability of certain features, and you may not be eligible for a refund for any unused time on your previous plan.
Q3. What should I do if I experience issues canceling my QuickBooks Online subscription?
If you experience issues canceling your QuickBooks Online subscription, contact their customer support team for assistance. You can reach their support team by phone or live chat, or you can submit a support request online. Make sure to provide as much detail as possible about the issue you’re experiencing to help them resolve it quickly.

