QuickBooks is one of the most widely used accounting software for small and medium-sized businesses. It is designed to manage and organize financial information such as sales, expenses, and payroll. However, QuickBooks error H303 can be a frustrating problem for users, and it can disrupt their daily business operations. In this article, we will explore the meaning, causes, solutions, and prevention tips for QuickBooks error code H303.

What is QuickBooks Error H303?
QuickBooks error H303 is a common error that occurs when a user attempts to access a QuickBooks file located on another computer. It is typically caused by a network or multi-user issue, and it prevents the user from accessing the file. The error message usually reads: “QuickBooks Error Code H303: The computer you are trying to reach is not available.”
Causes of QuickBooks Error H303
There are several reasons why QuickBooks error H303 can occur, including:
- Network connectivity issues – The error may be caused by network connectivity problems, such as a weak or unstable network connection.
- Firewall settings – Firewall settings may also cause Error H303 QuickBooks . If the firewall settings are too strict, they can prevent the user from accessing the QuickBooks file.
- Damaged QuickBooks file – A damaged QuickBooks file may also cause the error. If the file is corrupted, the user may not be able to access it.
- Incorrect hosting settings – Incorrect hosting settings may also be the cause of QuickBooks error H303. If the hosting settings are not configured correctly, the user may not be able to access the file.
- Outdated software – Outdated QuickBooks software may also cause the error. If the software is not up to date, it may not function correctly.
Solutions of QuickBooks Error H303
Solution 1: Check your network connectivity
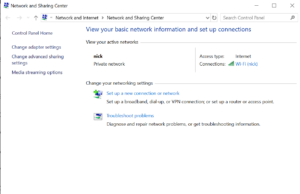
- Ensure that all computers are connected to the same network.
- Check the strength and stability of the network connection.
- Restart the router and the computers to refresh the network.
- If using a wired connection, check that all cables are properly connected.
- Disable any VPN or remote access software that may be interfering with the network connection.
- Temporarily disable any antivirus software that may be blocking the network connection.
Solution 2: Adjust your Firewall settings
- Open your Firewall settings.
- Add QuickBooks to the list of allowed programs.
- Configure the Firewall settings to allow QuickBooks to access the network.
- If you are unsure how to adjust the Firewall settings, contact your IT department or network administrator for assistance.
- If using a third-party Firewall software, consult the software’s user guide for specific instructions.
- Ensure that your Firewall software is up to date and has the latest definitions.
- Test the connection to the QuickBooks file to ensure that the changes have been successful.
Solution 3: Rename the .ND and .TLG files
- Locate the folder where the QuickBooks file is stored.
- Look for files with the extensions .ND and .TLG.
- Right-click on the files and select “Rename”.
- Add .OLD to the end of their names.
- Press Enter to save the changes.
- Restart QuickBooks.
- Open the company file again and try to access it.
Solution 4: Use the QuickBooks Connection Diagnostic Tool
- Download and install the QuickBooks Connection Diagnostic Tool.
- Run the tool and follow the instructions to scan your computer.
- The tool will identify any network issues that may be causing the error.
- If any issues are found, follow the tool’s recommendations to resolve them.
- If the tool is unable to resolve the issue, contact QuickBooks support for further assistance.
- Ensure that the tool is up to date and has the latest definitions.
- Use the tool regularly to diagnose and fix any potential network issues before they cause errors.
Solution 5: Update QuickBooks software
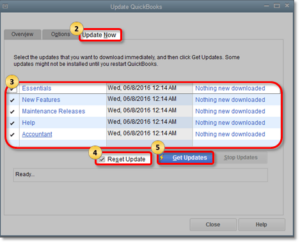
- Open QuickBooks and click on the Help menu.
- Click on Update QuickBooks Desktop.
- Follow the instructions to download and install the latest updates.
- Ensure that your system meets the minimum requirements for the latest version of QuickBooks.
- Close all other programs before installing the updates.
- Backup your company file before updating QuickBooks.
- After the update is complete, open the company file and check that the issue has been resolved.
Conclusion:
QuickBooks Error H303 can be a frustrating issue to deal with, but it is also a common one. By understanding the causes of the error and following the solutions provided in this article, you can easily fix the issue and prevent it from occurring in the future. It is important to regularly update your QuickBooks software, back up your company file, and maintain a strong and stable network connection to avoid any potential issues. If you continue to experience the error, do not hesitate to contact QuickBooks support or consult with your IT department for further assistance.
Frequently Asked Questions (FAQs)
Q.1 Can I fix QuickBooks Error H303 on my own?
Yes, you can fix Error Code H303 QuickBooks on your own by following the solutions provided in this article. However, if you are not confident in your technical abilities, it is recommended that you contact QuickBooks support or consult with your IT department.
Q.2 How do I know if my company file is damaged?
If your company file is damaged, you may experience issues such as missing or incorrect data, error messages when trying to save or open the file, or slow performance. To check for file damage, you can use the QuickBooks File Doctor tool, which can diagnose and repair file issues.
Q.3 How can I prevent QuickBooks Error H303 from occurring in the future?
You can prevent QuickBooks Error Code H303 from occurring in the future by ensuring that your network is set up correctly, updating your firewall and antivirus software, regularly backing up your company file, and keeping your QuickBooks software up to date.

