Microsoft .Net Framework is an essential component of many applications running on Windows 10. However, in some cases, it might be necessary to remove .Net Framework from your system. The reasons for this could be to troubleshoot issues with the framework, freeing up space on your hard drive, or updating to a newer version of .Net Framework. In this guide, we will walk you through the steps to safely uninstall .Net Framework on Windows 10.
Why Uninstall .Net Framework
There can be several reasons for wanting to uninstall .Net Framework on Windows 10. Some common reasons include:
- To free up disk space
- To resolve compatibility issues with other software
- To resolve errors and performance issues
- To install a newer version of .Net Framework
Prerequisites Before Uninstalling
Before proceeding with the uninstallation process, it is important to keep in mind a few prerequisites.
- Make sure that you have administrative privileges on your Windows 10 computer
- Make sure that you have a backup of important data
- Make sure that you have the product key of your Windows 10 installation
Tips to Avoid Issues During the Uninstallation Process
- Avoid interrupting the uninstallation process
- Do not close the window or shut down the computer during the uninstallation process
- Do not install any other software during the uninstallation process.
Solutions to Uninstall .Net Framework in WIndows 10
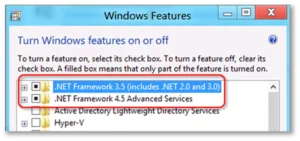
Step 1: Check the Installed Version of .Net Framework
Before uninstalling .Net Framework, it is important to determine which version is installed on your Windows 10 PC. Here’s how you can do this:
- Click on the Windows Start button and type “Control Panel” in the search bar
- Click on “Control Panel” to open it
- In the Control Panel, select “Programs and Features”
- Scroll through the list of installed programs and look for “Microsoft .Net Framework”
- If multiple versions are installed, make note of which version you need to remove
Step 2: Backup Your System
Before proceeding with the uninstallation process, it is important to backup your system to avoid any data loss. You can restore backup using the built-in Backup and Restore feature in Windows 10 or use a third-party backup software.
Step 3: Uninstall .Net Framework using Control Panel
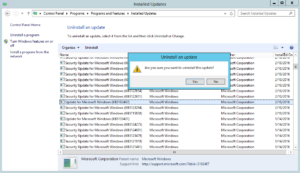
Once you have determined which version of .Net Framework you need to remove, you can proceed with the uninstallation process using the Control Panel. Here’s how you can do it:
- Open the Control Panel
- Select “Programs and Features”
- Right-click on the version of .Net Framework you want to remove and select “Uninstall”
Step 4: Remove Leftover Files and Folders
In some cases, the uninstallation process might not completely remove all the files and folders associated with .Net Framework. Here’s how you can manually remove any leftover files and folders:
- Open File Explorer and navigate to the following location: “C:\Windows\Microsoft.NET\Framework”
- Delete the folder associated with the version of .Net Framework you uninstalled
- Navigate to the following location: “C:\Windows\Microsoft.NET\Framework64” (if you have a 64-bit system)
- Delete the folder associated with the version of .Net Framework you uninstalled
Step 5: Verify the Uninstallation
After completing the steps to uninstall .Net Framework, it is important to verify that the framework has been successfully removed from your system. Here’s how you can do this:
- Open the Control Panel
- Select “Programs and Features”
- Check if the version of .Net Framework you uninstalled is no longer listed in the list of installed programs.
How to Integrate Microsoft .NET with QuickBooks
Microsoft .NET is a framework that provides a platform for developing and running applications on Windows. Here’s how you can integrate Microsoft .NET with QuickBooks:
Step 1: Determine Your Integration Requirements
Before you start the integration process, it’s important to determine your requirements for integrating Microsoft .NET with QuickBooks. This will help you determine the best approach for your integration project.
Step 2: Choose an Integration Method
There are several ways to integrate Microsoft .NET with QuickBooks, including using QuickBooks APIs, QuickBooks SDK, or a third-party integration solution. You can choose the integration method that best fits your needs and technical expertise.
Step 3: Set Up a Development Environment
To integrate Microsoft .NET with QuickBooks, you’ll need to set up a development environment that includes the Microsoft .NET framework, a development environment such as Visual Studio, and the QuickBooks SDK.
Step 4: Use the QuickBooks SDK
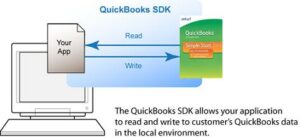
The QuickBooks SDK provides a set of tools and resources that you can use to develop applications that integrate with QuickBooks. To integrate Microsoft .NET with QuickBooks, you’ll need to use the QuickBooks SDK to create an application that communicates with QuickBooks.
Step 5: Test Your Integration
Once you’ve completed the integration process, it’s important to test your integration to ensure that it’s working as expected. You can use the testing tools provided by the QuickBooks desktop to validate the functionality of your integration.
Step 6: Deploy Your Integration
After testing your integration, you can deploy it to your production environment. You’ll need to make sure that your integration is properly configured and that it meets all the requirements for deploying a Microsoft .NET application.
Conclusion
Uninstalling .Net Framework on Windows 10 can be a simple process if you follow the steps outlined in this article. However, it is important to keep in mind the prerequisites and tips to avoid any issues during the uninstallation process. If you encounter any issues, seek the assistance of a professional.
Frequently Asked Questions (FAQs)
Q.1 Can I reinstall .Net Framework after uninstalling it?
Yes, you can reinstall .Net Framework after uninstalling it. Simply download the desired version of .Net Framework from the Microsoft website and follow the on-screen instructions to complete the installation process.
Q.2 What should I do if I encounter errors during the uninstallation process?
If you encounter errors during the uninstallation process, you can try the following troubleshooting steps:
- Restart your PC and try uninstalling .Net Framework again
- Use the Microsoft .Net Framework Repair Tool to repair any corrupted files
- Use the System Restore feature in Windows 10 to restore your system to a previous state

