If you’re a small business owner or an accountant, you know that QuickBooks is a powerful accounting software that can help you manage your finances efficiently. However, sometimes you may need to export data from QuickBooks to Excel to perform complex analyses or to create custom reports. In this article, we’ll show you how to data export from QuickBooks to Excel, step-by-step.
Why export from QuickBooks to Excel?
There are several reasons why you might need to export data from QuickBooks to Excel, including:
- Analyzing financial data: You may need to perform complex analyses on your financial data, such as calculating ratios or creating pivot tables, which is easier to do in Excel.
- Creating custom reports: QuickBooks has several built-in reports, but sometimes you may need to create a custom report that is not available in QuickBooks.
- Manipulating data: You may need to manipulate data in ways that are not possible in QuickBooks, such as combining data from multiple sources or creating charts and graphs.
Exporting from QuickBooks to Excel: Step-by-step Guide
Exporting data from QuickBooks to Excel is a straightforward process that can be completed in a few simple steps. Here’s how:
Step 1: Open the QuickBooks report you want to export
Open QuickBooks and navigate to the report you want to export. You can choose from several built-in reports, such as Profit and Loss, QuickBooks Balance Sheet, or Customer Balance Detail, or create a custom report.
Step 2: Customize the report
If you want to customize the report before exporting it, you can do so by clicking the Customize Report button. Here, you can change the report period, add or remove columns, and apply filters.
Step 3: Export the report to Excel
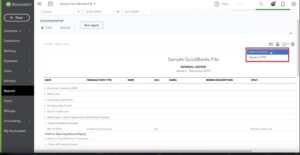
Once you’ve customized the report, click the Export button at the top of the screen and select Export to Excel. QuickBooks will generate an Excel file and save it to your computer.
Step 4: Open the Excel file
Open the Excel file to view the exported data. The Excel file will contain all the data from the QuickBooks report, including any customizations you made.
Step 5: Manipulate the data
If you need to manipulate the data further, you can do so in Excel. For example, you can create pivot tables, filter the data, or add charts and graphs.
Best practices for exporting from QuickBooks to Excel
To ensure that your exported data is accurate and complete, it’s important to follow best practices when export from QuickBooks to Excel. Here are some tips:
- Check your data: Before exporting, make sure that the data in QuickBooks is accurate and up-to-date.
- Choose the right report: Select the report that contains the data you need, and customize it as needed.
- Use Excel formatting: To make the exported data easier to read, use Excel formatting tools such as color-coding, bolding, and font size changes.
- Keep track of changes: If you make changes to the Excel file, make sure to keep track of them so that you can update your QuickBooks records if needed.
Conclusion
Export from QuickBooks to Excel can be a powerful tool for small business owners and accountants. With just a few simple steps, you can export financial data from QuickBooks and manipulate it in Excel to create custom reports, perform complex analyses, or create QuickBooks charts of accounts and graphs. By following best practices and ensuring data accuracy, you can make the most of this powerful feature and take your financial management to the next level.
Frequently Asked Questions (FAQs)
Q.1 Can I export data from QuickBooks to other formats besides Excel?
Yes, QuickBooks also allows you to export data to other formats, such as PDF, CSV, or XML. The process for exporting to these formats is similar to exporting to Excel.
Q.2 Can I export data from QuickBooks to Excel on a regular basis?
Yes, you can automate the process of data export from QuickBooks to Excel using the built-in Scheduled Reports feature. This allows you to create a report and specify a schedule for it to be automatically exported to Excel and emailed to you or another recipient.
Q.3 Can I export data from QuickBooks Online to Excel?
Yes, the process for exporting data from QuickBooks Online to Excel is similar to exporting from QuickBooks Desktop. Simply open the report you want to export, customize it if needed, and click the Export button to select Excel as the export format.
Q.4 Can I export data from QuickBooks to Excel on a Mac?
Yes, you can data export from QuickBooks to Excel on a Mac using the same process as on a Windows computer. Simply open the report you want to export, customize it if needed, and click the Export button to select Excel as the export format.

