
Are you a small business owner looking for an easy and efficient way to set up a 401k plan for your employees? Look no further than QuickBooks! QuickBooks offers a simple and straightforward 401k setup process that can help you and your employees save for retirement. In this article, we’ll explore what QuickBooks 401k setup is, its benefits, and how to set it up in just a few steps.
What is QuickBooks 401k Setup?
QuickBooks 401k setup is a feature that allows small business owners to set up and manage a 401k retirement plan for their employees directly within their QuickBooks account. With this feature, you can easily manage employee contributions, employer contributions, and any necessary payroll deductions. QuickBooks payroll setup 401k offers a range of benefits for both you and your employees.
Benefits of QuickBooks 401k Setup
- Easy to set up: QuickBooks 401k setup makes it easy for small business owners to set up and manage a retirement plan for their employees.
- Convenient: With QuickBooks 401k setup, you can manage your retirement plan directly within your QuickBooks account, saving you time and hassle.
- Customizable: QuickBooks payroll setup 401k allows you to choose from a range of investment options to create a retirement plan that meets your employees’ needs.
- Tax benefits: Contributions to a 401k plan are tax-deductible, which can help reduce your business’s tax liability.
- Competitive advantage: Offering a 401k plan can help you attract and retain top talent.
- Employee satisfaction: Providing a retirement plan can boost employee morale and satisfaction.
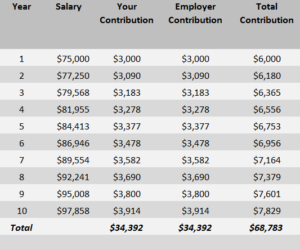
- Increased savings: A 401k plan encourages employees to save for retirement, helping them achieve their long-term financial goals.
- Employer contributions: As an employer, you have the option to make contributions to your employees’ retirement accounts, helping them save even more.
- Reduced turnover: Offering a retirement plan can help reduce employee turnover by providing long-term financial security.
- Compliance: QuickBooks 401k setup ensures that your retirement plan is compliant with all applicable laws and regulations.
How to Setup 401k Wash Account in QuickBooks?
Setting up a 401k wash account in QuickBooks is a straightforward process that can be completed in just a few steps. Here are five solutions with seven steps to help you get started:
Solution 1: Add 401k Contributions to Employee Paychecks
- From the Employees menu, select the Employee Center.
- Select the employee for whom you want to add 401k contributions.
- Click the Payroll Info tab.
- Click the Additions, Deductions, and Company Contributions button.
- Select the 401k contribution item from the list.
- Enter the amount to deduct from the employee’s paycheck.
- Click OK to save the changes.
Solution 2: Create a Payroll Item for 401k Contributions
- Firstly, In the Lists menu, select the “Payroll” Item List.
- Click the New Item button.
- Select Custom Setup and click Next.
- Select Deduction and click Next.
- Enter a name for the payroll item (e.g., 401k Contributions).
- Enter a description for the payroll item.
- Enter the tax tracking type and the taxability of the payroll item.
- Click Next and enter the deduction and contribution amounts.
- Click Finish to save the payroll item.
Solution 3: Set up a 401k Vendor
- From the Vendors menu, select Vendor Center.
- Click the New Vendor button.
- Enter the name of your 401k vendor.
- Enter the vendor’s address and contact information.
- Click OK to save the vendor information.
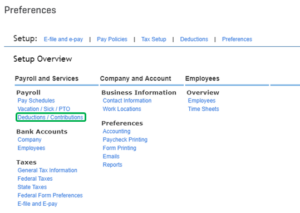
Solution 4: Create a Liability Account for 401k Contributions
- First, Go to the list menu
- Then, select the QuickBooks Chart of Accounts.
- Click the New Account button.
- Select Other Current Liabilities and click Continue.
- Enter a name for the account (e.g., 401k Contributions Payable).
- Enter a description for the account.
- Select the 401k vendor you created in Solution 3 as the “Who you owe” account.
- Click Save & Close to save the account.
Solution 5: Record 401k Contributions
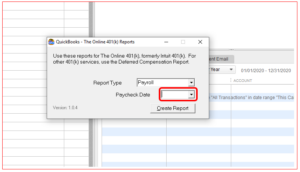
- From the Employees menu, select Payroll Taxes and Liabilities and then select Deposit Liabilities.
- Select the 401k Contributions Payable account from the list.
- Now, Enter the date of the deposit and the amount in QuickBooks.
- Click OK to save the deposit.
Conclusion
In conclusion, QuickBooks 401k Setup can be done easily and efficiently by following the step-by-step instructions provided in the software. It is important to ensure that all necessary information is entered accurately and completely in order to avoid errors and ensure compliance with IRS regulations. Once the setup is complete, employees can begin contributing to their 401k plans and employers can start tracking and managing their contributions.
Frequently Asked Questions (FAQs)
Q.1 What is a 401k plan and how do I set it up in QuickBooks?
A 401k plan is a retirement savings plan that allows employees to contribute a portion of their salary to a tax-deferred account. Employers can also contribute to the plan on behalf of their employees. To Quickbooks payroll setup 401k, you will need to create a new payroll item and specify the contribution amount and frequency. You will also need to ensure that you are complying with IRS regulations and reporting requirements.
Q.2 How do I reconcile my bank accounts in QuickBooks?
Reconciling your bank accounts in QuickBooks involves matching the transactions in your QuickBooks account with the transactions on your bank statement. To do this, you will need to review your bank statement and mark the transactions in QuickBooks as either cleared or uncleared. QuickBooks provides a reconciliation tool to make this process easy and efficient.
Q.3 How do I set up my company in QuickBooks?
To set up your company in QuickBooks, you will need to create a new company file and enter basic information such as your company name, address, and tax identification number. You will also need to choose your accounting method, set up your chart of accounts, and enter your opening balances. QuickBooks provides step-by-step instructions to help you set up your company quickly and easily.

