Are you a business owner looking for an efficient and reliable way to manage your billing processes? Look no further than QuickBooks. In this article, we will explore the world of billing in QuickBooks and how it can help you streamline your financial operations. Whether you are a small business owner or a freelancer, QuickBooks offers powerful features and solutions to make billing a breeze.
Importance of Billing in QuickBooks
Accurate and efficient billing is crucial for the financial health of any business. It ensures timely payment collection, helps in tracking expenses, and provides valuable insights into cash flow. QuickBooks understands the significance of billing and offers a range of features to streamline the process.
QuickBooks Billing Solutions
Invoicing Features
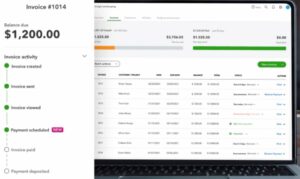
QuickBooks provides robust invoicing features that allow you to create professional-looking invoices with ease. You can customize invoice templates, add your company logo, and include all the necessary details such as item descriptions, quantities, and prices. Additionally, you can set payment terms and due dates to ensure prompt payments from your clients.
Payment Processing
QuickBooks simplifies payment collection by integrating with various payment gateways. You can easily set up online payment options, allowing your customers to pay invoices electronically. QuickBooks supports major credit cards, bank transfers, and even digital wallets, giving your clients flexibility in choosing their preferred payment method.
Automation and Integration
One of the biggest advantages of using QuickBooks for billing is its automation capabilities. QuickBooks can automate recurring invoices, saving you time and effort. You can set up billing schedules for regular customers, and QuickBooks will generate and send invoices automatically. Moreover, QuickBooks seamlessly integrates with other business tools, such as CRM systems and project management software, streamlining your workflows and ensuring data consistency.
Setting Up Billing in QuickBooks
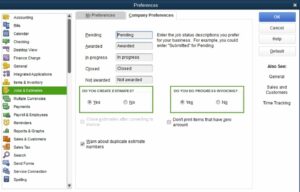
To start the QuickBooks billing process, you need to set up your account and configure the necessary settings. Here are the key steps to get started:
Creating Products and Services
First, you need to create a list of products and services that you offer. This includes items you sell, hourly rates for services, and any additional charges or discounts. By setting up your products and services in QuickBooks, you can easily add them to your invoices and track sales.
Setting Up Payment Methods
Next, you should set up the payment methods you accept. Whether it’s credit card payments, bank transfers, or checks, QuickBooks allows you to specify your preferred payment options. You can also connect your QuickBooks account to payment gateways like PayPal or Stripe for seamless payment processing.
Customizing Invoices
Customizing your invoices helps you establish your brand identity and create a professional image for your business. In QuickBooks, you can personalize your invoice templates by adding your company logo, choosing fonts and colors, and including additional information such as contact details or terms and conditions. A well-designed invoice not only looks impressive but also builds trust with your clients.
QuickBooks Online Billing
In addition to the desktop version, QuickBooks offers an online version that provides even more convenience and flexibility for billing. Here are the benefits of using QuickBooks Online for billing:
Benefits of Online Billing
With QuickBooks Online, you can access your billing information from anywhere, as long as you have an internet connection. This makes it ideal for businesses with remote teams or for those who are frequently on the go. You can easily send invoices, track payments, and monitor your financials on the web or through the QuickBooks mobile app.
Using Online Invoicing
QuickBooks Online allows you to create and send invoices directly from the platform. You can add customers’ email addresses, set invoice terms, and attach any necessary documents. Online invoicing ensures quick delivery and eliminates the need for physical mail or manual paperwork.
Accepting Online Payments
QuickBooks Online integrates seamlessly with various online payment providers, making it easy for your clients to pay you electronically. You can include payment links in your online invoices, allowing customers to make payments with just a few clicks. This not only speeds up the payment collection process but also improves cash flow for your business.
Streamlining Billing Processes with QuickBooks
Aside from basic invoicing, QuickBooks offers several features that can streamline your billing processes. Let’s explore some of them:
Automating Recurring Invoices
For businesses that have regular billing cycles, QuickBooks enables you to automate recurring invoices. You can set up the frequency, start date, and end date for recurring invoices, and QuickBooks will automatically generate and send them on your behalf. This feature saves you time and ensures that you never miss billing your clients on time.
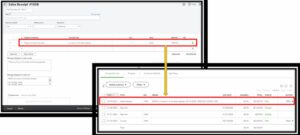
Managing Billable Hours
If you charge your clients based on billable hours, QuickBooks makes it easy to track and bill for your time. You can use the built-in time-tracking feature to log the hours spent on specific projects or tasks. QuickBooks then calculates the total billable amount, and you can include it in your invoices effortlessly.
Tracking Expenses
In addition to billing, QuickBooks allows you to track your business expenses efficiently. You can record and categorize expenses, attach receipts, and even link expenses to specific clients or projects. This integrated expense tracking feature gives you a comprehensive view of your financials and helps you stay organized during tax season.
Integrating QuickBooks with Third-Party Billing Systems
QuickBooks understands that businesses may already have existing billing systems or use other tools for specific purposes. That’s why it offers integration capabilities to ensure a seamless flow of data across different platforms. Here’s how you can integrate QuickBooks with third-party billing systems:
API Integration
QuickBooks provides an Application Programming Interface (API) that allows developers to integrate their own applications or services with QuickBooks. This enables you to sync data between QuickBooks and your preferred billing system, ensuring consistency and reducing manual data entry.
Syncing Data
Some third-party billing systems offer built-in integration with QuickBooks. By connecting these systems to QuickBooks, you can automatically sync customer data, invoices, and payment information. The integration removes the necessity of entering duplicate data and reduces the likelihood of errors or inconsistencies.
Streamlining Workflows
Integrating QuickBooks with third-party billing systems streamlines your workflows and improves efficiency. It enables data sharing, reduces manual tasks, and ensures that all your financial information is up to date across different platforms. This integration is particularly beneficial for businesses that have complex billing requirements or operate in multiple industries.
Best Practices for Billing QuickBooks
To make the most of QuickBooks’ billing features, consider implementing the following best practices:
Regularly Reviewing Invoices
Reviewing your invoices before sending them to clients is essential to maintain professionalism and accuracy. Double-check the pricing, item descriptions, and any special instructions to avoid errors or misunderstandings. By reviewing your invoices, you can ensure that the billing information is correct and reflects the agreed-upon terms with your clients.
Ensuring Accurate Data Entry
Accurate data entry is crucial for maintaining the integrity of your financial records. When entering customer information, invoice details, or payment data, be diligent and avoid typos or mistakes. QuickBooks provides validation checks to help you identify errors, but it’s always best to double-check and ensure that your data is accurate from the start.
Providing Detailed Descriptions
To avoid confusion and disputes, include detailed descriptions for each item or service on your invoices. Clearly explain what the customer is being billed for, including any additional charges or discounts. Providing detailed descriptions helps your clients understand the value they are receiving and reduces the likelihood of payment disputes.
Common Issues and Troubleshooting
While QuickBooks is a reliable billing solution, you may encounter some issues or challenges along the way. Below are some prevalent problems and their potential remedies:
Invoice Discrepancies
If you notice discrepancies between your invoices and the expected amounts, review the invoice settings and ensure that the correct pricing and calculations are applied. Check for any duplicate invoices or incorrect data entry. If the problem continues, contact QuickBooks customer support for additional help.
Payment Processing Errors
In case you encounter errors or issues with payment processing, verify that your payment settings are correctly configured. Ensure that you have a stable internet connection and that your payment gateway integration is functioning properly. If problems persist, contact your payment provider or consult the QuickBooks support team for guidance.
Syncing and Integration Problems
If you experience difficulties with data syncing or integrating QuickBooks with third-party systems, ensure that you have followed the integration steps correctly. Double-check the API settings and permissions, and verify that the necessary data fields are mapped correctly between the systems. If the issue persists, consult the documentation or support resources provided by the third-party system or reach out to QuickBooks support for assistance.
Wrapping – Billing QuickBooks
Efficient billing is essential for the financial success of any business, and QuickBooks offers a comprehensive solution to streamline your billing processes. From creating professional invoices to automating recurring billing and integrating with other systems, QuickBooks provides the tools you need to manage your billing efficiently. By following best practices and leveraging the features of QuickBooks, you can improve cash flow, save time, and ensure accurate financial records.
FAQs
1. Can I use QuickBooks for billing if I’m not a business owner?
Absolutely! QuickBooks is designed to cater to the needs of business owners, freelancers, and self-employed individuals alike. Whether you are a sole proprietor, a contractor, or a consultant, QuickBooks offers features that can help you manage your billing effectively.
2. Is QuickBooks suitable for large-scale billing operations?
Yes, QuickBooks is scalable and can accommodate businesses of all sizes. Whether you have a small startup or a large enterprise, QuickBooks provides the necessary tools and capabilities to handle your billing needs. You can manage multiple clients, track expenses, and generate detailed financial reports to support your business growth.
3. Can I customize the appearance of invoices in QuickBooks?
Absolutely! QuickBooks allows you to customize your invoice templates according to your branding requirements. You can add your company logo, choose fonts and colors, and include additional information such as contact details or terms and conditions. Customizing your invoices helps you create a professional image and reinforce your brand identity.
4. Can I accept international payments through QuickBooks?
Yes, QuickBooks supports international payments. You can configure your payment settings to accept various currencies and enable international payment gateways. This allows you to expand your customer base and cater to clients from around the world, making it convenient for them to pay you in their local currency.

