As a business owner, managing your employees’ records in QuickBooks Online is an important task to ensure accurate financial records. There may be times when an employee is no longer active in your company, and you need to make them inactive in QuickBooks Online. In this article, we’ll cover how to make employee inactive in QuickBooks online and how to reactivate them if needed.
Understanding the Concept of Inactive Employees
An inactive employee is an individual who no longer works for your company but has records and information stored in QuickBooks Online. Inactive employees cannot be used to create new transactions or modify existing ones, but their records will still appear in reports and data analysis. It’s important to make an employee inactive to ensure the accuracy of your financial records and prevent any accidental use of their information.
Why Make an Employee Inactive in QuickBooks Online?
There are various reasons why you may need to make an employee inactive in QuickBooks Online. Here are a few common examples:
- Employee resignation or termination
- Employee Retirement
- The employee taking a long leave of absence
- Employee moving to a different role within the company
- Employee passing away
Whatever the reason may be, making an employee inactive is a straightforward process.
How to Make Employee Inactive in QuickBooks Online
Follow these steps to make an employee inactive in QuickBooks Online:
Step 1: Open the Employee List
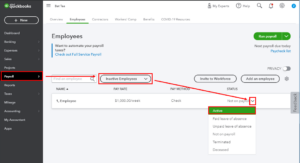
To make an employee inactive, you must first open the Employee List. To do this, navigate to the Employees tab on the left-hand menu and select the Employee List.
Step 2: Select the Employee to Make Inactive
Once you’re on the Employee List page, find the employee you want to make inactive and select their name.
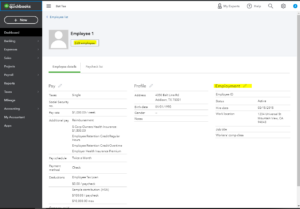
Step 3: Edit the Employee Information
After selecting the employee, you will be directed to their individual profile page. On this page, select the Edit button to make changes to their information.
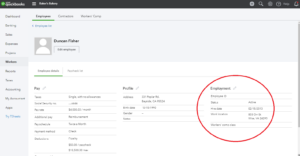
Step 4: Set the Employee Status as Inactive
In the employee’s profile page, scroll down to the Employment section, and look for the Status field. Select the dropdown menu and choose Inactive.
Step 5: Save the Changes
After setting the employee’s status as inactive, click the Save button to update the changes. The employee’s record will still appear in reports and data analysis, but it will no longer be available for use in new transactions or modifications of existing ones.
Impact of Making an Employee Inactive in QuickBooks Online
When you make an employee inactive in QuickBooks Online, it will have various impacts on your company’s financial records. Here are a few examples:
Payroll and Employee-Related Transactions
If the inactive employee has any outstanding payroll checks or employee-related transactions, you can still process them even after making them inactive. However, you will no longer be able to assign the inactive employee to any new transactions, such as paychecks or time entries. This ensures that all future transactions are recorded accurately and are not accidentally assigned to an inactive employee.
Reports and Data Analysis
Making an employee inactive will not remove their records from your company’s financial reports or data analysis. Instead, the employee’s information will be stored in QuickBooks Online for historical purposes. However, you can filter out inactive employees from reports to view only the active employees’ data.
How To Make Inactive Employee Active In QuickBooks Online
If you need to reactivate an employee who was previously made inactive in QuickBooks Online, follow these steps:
- Go to the Employee List by clicking on the Employees tab on the left-hand side of the screen.
- Click on the small gear icon located in the upper right-hand corner of the screen and select Include inactive.
- Locate the inactive employee you want to reactivate and click on their name.
- Click on the Edit button located in the upper right-hand corner of the screen.
- In the Edit Employee window, change the employee’s status from Inactive to Active.
- Click on the Done button to save the changes.
Once you’ve completed these steps, the previously inactive employee will now be active in QuickBooks Online. You can assign them to new transactions, such as paychecks or time entries, just like any other active employee.
It’s important to note that reactivating an employee will not restore any previously deleted transactions. However, their historical data will still be available in QuickBooks Online for reference and analysis.
Conclusion
Making an employee inactive in QuickBooks Online is a simple process that ensures the accuracy of your financial records. Inactive employees cannot be used to create new transactions or modify existing ones, but their records will still appear in reports and data analysis. By following the steps outlined in this article, you can make an employee inactive in QuickBooks Online with ease.
Additionally, we covered how to make inactive employee active in QuickBooks online if they return to work for your company. By following the steps provided, you can manage your employees’ records effectively in QuickBooks Online and ensure that your financial records are accurate and up-to-date.
Frequently Asked Questions (FAQs)
Q1. How can I check if an employee is inactive in QuickBooks Online?
To check if an employee is inactive in QuickBooks Online, go to the Employee Center and locate the employee in question. If the employee is inactive, their name will appear in gray and have the status of “Inactive” next to it.
Q2: Can I make multiple employees inactive at once in QuickBooks Online?
Yes, you can make multiple employees inactive at once in your QuickBooks account. To do so, go to the Employee Center and select the employees you want to make inactive. Click on the Batch Actions drop-down menu and select Make Inactive. Confirm your selection and the selected employees will now be inactive.
Q3: How can I delete an employee’s record in QuickBooks Online?
If you need to delete an employee’s record in QuickBooks Online, go to the Employee Center and select the employee in question. Click on the Edit button and select Delete Employee. Confirm your selection and the employee’s record will be deleted permanently. Note that this action cannot be undone, and the employee’s data will be removed from all reports and transactions.

