Filing 1099 forms is an important part of your tax reporting process. It’s crucial to issue these forms to vendors and contractors who provided services to your business and received payments exceeding $600 in the previous year. QuickBooks provides a comprehensive platform to print and file 1099 forms, saving you time and effort.
In this article, we’ll cover everything you need to know about QuickBooks 1099 forms, including how to set up vendors, print forms, and file them with the IRS. We’ll also address some common issues users face while printing and filing 1099 forms and provide solutions to those problems.

What is a 1099 form?
A 1099 form is a tax form used by businesses to report income paid to non-employees, such as independent contractors, freelancers, and vendors. The form is used to report various types of income, including payments for services provided, rent, royalties, and other income.
There are several types of 1099 forms, including the 1099-MISC, 1099-NEC, 1099-DIV, and 1099-INT. The form you need to file depends on the type of income you paid to the vendor or contractor.
QuickBooks 1099 forms: An Overview
QuickBooks provides a platform to generate and print 1099 forms for your vendors and contractors. The software allows you to set up vendors, track payments, and generate reports for tax purposes.
To print 1099 forms in QuickBooks, you’ll need to set up vendors and their payments first. QuickBooks provides a user-friendly platform to track vendor payments and generate 1099 forms based on the payments made.
How to set up 1099 vendors in QuickBooks?
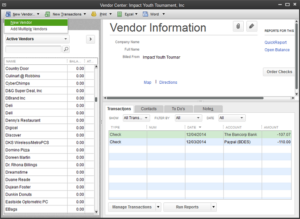
Before you can print 1099 forms in QuickBooks, you need to set up the vendors who received payments in the previous year. Here’s how to set up vendors for 1099 reporting in QuickBooks:
- Click on the Vendors menu and select Vendor Center.
- Click the New Vendor button to add a new vendor.
- Fill in the vendor’s name, address, and tax ID number in the appropriate fields.
- Make sure the “Track payments for 1099” option is selected.
- Click OK to save the vendor.
How to print 1099 in QuickBooks?
Printing 1099 forms in QuickBooks is a straightforward process. Here’s how to do it:
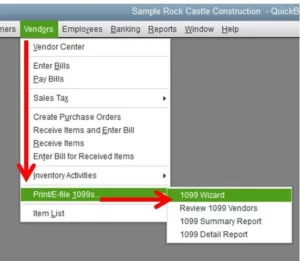
- From the File menu, select Print Forms and then click on 1099s/1096.
- Select the 1099 form you want to print. You can choose between the 1099-MISC or 1099-NEC, depending on the type of income you paid to the vendor.
- Choose the vendors for whom you want to print the 1099 forms. You can select vendors individually or choose them in bulk.
- Check the information displayed on the 1099 form, including the vendor’s name, address, and tax ID number. If any information is incorrect, you can update it by clicking on the Edit button.
- Once you’ve verified the information, click on Print.
- QuickBooks will generate the 1099 forms for the selected vendors. You can print them on pre-printed forms or print them on plain paper and then copy the information onto the pre-printed forms.
Common issues with QuickBooks 1099 printing and their solutions
Users often encounter some issues while printing 1099 forms in QuickBooks. Here are some common issues and their solutions:
Issue 1: Incorrect information on the 1099 form
Solution: Before printing the 1099 form, double-check the information displayed on the form, including the vendor’s name, address, and tax ID number. If any information is incorrect, update it by clicking on the Edit button.
Issue 2: Incorrect alignment of the 1099 form
Solution: Make sure the alignment of the 1099 form is correct before printing. You can do this by printing a test page on plain paper and then holding it up against the pre-printed forms. Adjust the alignment as necessary.
Issue 3: Missing or incorrect data in the 1099 form
Solution: Ensure that all the required fields on the QuickBooks 1099 form are filled in correctly. This includes the vendor’s name, address, tax ID number, and the amount paid. If any fields are missing or incorrect, update them before printing.
How to file 1099 forms with the IRS using QuickBooks?
Once you have printed your 1099 forms, you need to file them with the IRS. QuickBooks provides an easy way to file 1099 forms electronically.
- From the File menu, select Print Forms and then click on 1099s/1096.
- Select the QuickBooks 1099 form you want to file.
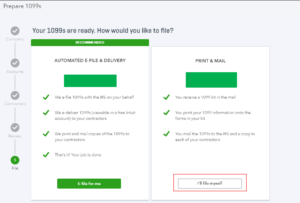
- Click on the E-file button.
- Follow the on-screen instructions to complete the e-filing process.
- Once you have completed the e-filing process, QuickBooks will provide you with a confirmation number.
Tips for a smooth 1099 filing process in QuickBooks
Here are some tips to help you have a smooth QuickBooks 1099 filing process:
- Set up your vendors and payments in QuickBooks throughout the year to avoid last-minute rush during tax season.
- Double-check the information on the QuickBooks 1099 forms before printing and filing.
- Use pre-printed 1099 forms to ensure correct alignment.
- File your 1099 forms electronically using QuickBooks to save time and effort.
- Keep a copy of the filed 1099 forms for your records.
Why is my 1099 report in QuickBooks blank?
If your 1099 report in QuickBooks is blank, it could be due to the following reasons:
- No payments made to vendors: If you have not made any payments to vendors that require QuickBooks 1099 reporting, your report will be blank.
- Incorrect date range: Make sure you are running the report for the correct date range. If the date range is incorrect, the report may show no data.
- Incorrect account mapping: Double-check that the accounts are correctly mapped to the 1099 boxes. If they are not mapped correctly, the report may not show any data.
- Data not entered correctly: Ensure that all the required fields, such as the vendor’s name, address, tax ID number, and the amount paid, are filled in correctly. If any fields are missing or incorrect, the report may not show any data.
Conclusion
In conclusion, QuickBooks 1099 forms can seem daunting at first, but with the right approach and understanding of the process, it can be a straightforward task. Printing and filing 1099 forms accurately and on time is important to ensure compliance with IRS regulations and avoid penalties. With the step-by-step guide provided in this article, you can confidently navigate the process of printing and filing 1099 forms in QuickBooks. Always make sure to double-check your data and consult with QuickBooks support if you encounter any issues. By following these best practices, you can streamline the process and ensure accurate reporting for your business.
Frequently Asked Questions (FAQs)
Q.1 Can I file 1099 forms electronically?
Yes, you can file QuickBooks 1099 forms electronically using the IRS FIRE (Filing Information Returns Electronically) system. QuickBooks also offers an e-file service for an additional fee.
Q.2 What is the penalty for not filing 1099 forms?
The penalty for not filing 1099 forms or filing them late can vary depending on the amount of time that has passed since the deadline. The penalty can range from $50 to $550 per form, depending on the length of delay and the size of your business.
Q.3 Can I print 1099 forms on regular paper?
No, you cannot print QuickBooks 1099 forms on regular paper. The IRS requires 1099 forms to be printed on specific perforated paper with red ink. This paper can be purchased from office supply stores or online.

