
As a small business owner, managing financial transactions is a crucial task. QuickBooks is one of the most popular accounting software solutions that simplify accounting tasks, including journal entries. In this article, we will provide a complete guide on QuickBooks journal entry, from what it is, why it is important, and how to make a journal entry in QuickBooks.
What is QuickBooks Journal Entry
QuickBooks is a cloud-based accounting software that helps small business owners manage their financial transactions. One of the essential tasks in accounting is journal entries, which record all transactions in the general ledger. In QuickBooks, journal entries allow you to record transactions that do not involve invoices or bills.
A journal entry is a recording of financial transactions that reflect the debit and credit accounts’ changes in the general ledger. In QuickBooks, journal entries are used to record transactions that do not involve invoices or bills, such as adjusting entries, transfers, or corrections. Journal entries can be created in QuickBooks by using the journal entry window.
Why is Journal Entries Important in QuickBooks?
Journal entries are essential in QuickBooks because they help to ensure that all financial transactions are accurately recorded in the general ledger. This is crucial for accurate financial reporting, tax preparation, and other financial analysis. Journal entries also help to maintain the accuracy of financial statements and ensure that the accounting records match the bank and credit card statements.
When to Use Journal Entries in QuickBooks
Here are some examples of when to use QuickBooks journal entry :
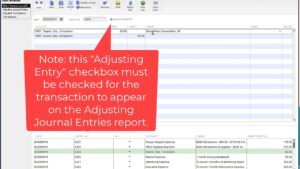
- To record adjusting entries such as depreciation, prepaid expenses, or accrued expenses
- To transfer funds between bank accounts or between a bank account and a credit card account
- To correct errors such as entering a wrong amount or account in a previous transaction
- To record unusual transactions that do not have an invoice or bill, such as a customer refund or a loan payment
How to Make a Journal Entry in QuickBooks
Creating a journal entries in QuickBooks is a straightforward process. Here are the steps to follow:
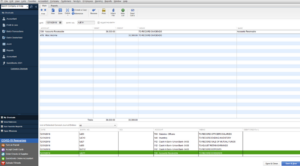
Step 1: Open the Journal Entry Window
To open the journal entry window, follow these steps:
- Click on the plus icon (+) in the top center of the screen.
- Select “Journal Entry” from the dropdown menu.
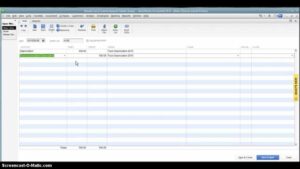
Step 2: Enter the Date of the Transaction
In the journal entry window, enter the date of the transaction in the “Date” field.
Step 3: Enter the Account Names and Numbers
In the “Account” column, enter the account names and numbers for the debit and credit transactions. If you don’t know the account numbers, you can search for them in the search bar.
Step 4: Enter the Amounts of Debit and Credit
After entering the account names and numbers, enter the debit and credit amounts for each transaction in the appropriate columns. Make sure that the total debits equal the total credits to balance the journal entry.
Step 5: Add a Memo
You can add a memo to the journal entry to provide additional information about the transaction. To add a memo, click on the “Memo” field and enter the details.
Step 6: Save the Journal Entry
Once you have entered all the details, click on the “Save and Close” button to save the journal entry.
Tips for Creating Accurate QuickBooks Journal Entry
To create an accurate journal entry in QuickBooks, follow these tips:
- Ensure that the debits and credits balance
- Use correct account names and numbers
- Include a memo for additional information
- Verify the accuracy of the journal entry before saving
- Make sure to regularly reconcile your bank and credit card QuickBooks statements.
Avoid Common Mistakes to Journal Entry in QuickBooks
Here are some common mistakes to avoid in QuickBooks journal entry:
- Entering incorrect account names or numbers
- Not balancing the debits and credits
- Missing a memo or providing insufficient information
- Not reconciling the journal entry with bank and credit card statements
Conclusion
Journal entries are an essential part of accounting in QuickBooks, allowing small business owners to record various financial transactions accurately. Creating QuickBooks journal entries is a simple process, but it’s crucial to follow the right steps and avoid common mistakes to ensure accurate financial reporting.
Frequently Asked Questions (FAQs)
Q1. Can I edit a Journal Entry after it has been saved in QuickBooks?
Yes, you can edit a Journal Entry after it has been saved in QuickBooks. To edit a Journal Entry, you need to locate the entry in the Journal Entry List and then click on the “Edit” option. Once you make the necessary changes, you can save the updated Journal Entry.
It’s important to note that if you have already reconciled your bank or credit card statements, editing a Journal Entry may affect the reconciliation. Therefore, it’s recommended to make sure that any changes made to a Journal Entry are properly reflected in the bank and credit card statements to avoid any discrepancies.
Q2. How can I delete a QuickBooks Journal Entry?
To delete a QuickBooks Journal Entry, you need to locate the entry in the Journal Entry List and then click on the “Delete” option. QuickBooks will prompt you to confirm whether you want to delete the entry, and once you confirm, the Journal Entry will be permanently removed from your accounting records.
It’s important to exercise caution when deleting QuickBooks Journal Entry, as it can have a significant impact on your financial records. Make sure to double-check and confirm that the Journal Entry needs to be deleted before proceeding.
Q3. Can I import Journal entries in QuickBooks from another software or spreadsheet?
Yes, you can import Journal Entries into QuickBooks from another software or spreadsheet. To do so, you need to first prepare the Journal Entry data in a compatible file format, such as a CSV or Excel file. Then, you can use the Import Data tool in QuickBooks to import the file and create the Journal Entries in your QuickBooks company file.
It’s important to note that when importing Journal Entries, you need to make sure that the data is accurate and complete to avoid any errors or discrepancies in your financial records. Additionally, it’s recommended to create a backup of your QuickBooks company file before importing any data to ensure that you can revert back to a previous version if needed.

