Managing bills and expenses is a critical aspect of running a business smoothly and maintaining financial stability. QuickBooks, a popular accounting software, offers a user-friendly solution for entering bills, tracking payments, and organizing financial records. In this comprehensive guide, we will walk you through the process of entering bills in QuickBooks Online and QuickBooks Desktop, providing detailed steps and valuable tips to maximize your efficiency and accuracy on QuickBooks enter bills.
How to Enter Bills in QuickBooks Online
QuickBooks Online simplifies the bill entry process, allowing you to efficiently manage your expenses. Follow these detailed steps to enter bills in QuickBooks Online:
- Login to QuickBooks Online: Access your QuickBooks Online account by entering your login credentials. If you haven’t created an account yet, register for one in order to begin.
- Navigate to Vendors: Once logged in, you will find the main dashboard. From there, click on the “Vendors” tab or locate it in the left navigation panel.
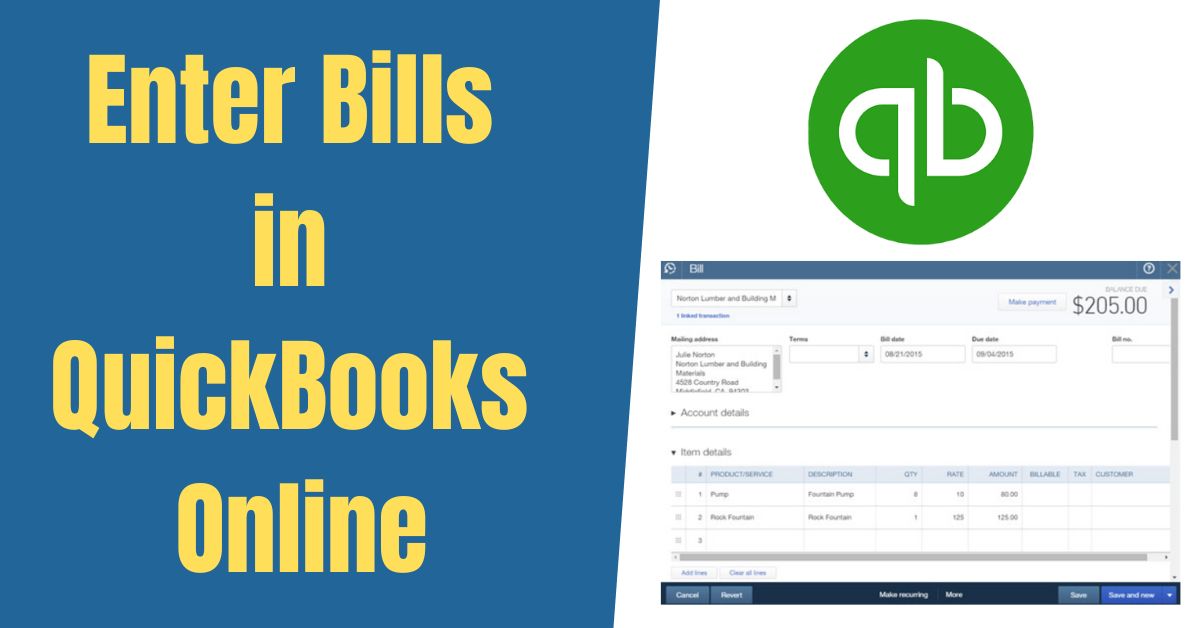
- Select “Enter Bills”: Within the “Vendors” menu, choose the option “Enter Bills” to initiate the QuickBooks enter bills process.
- Enter Vendor Details: In the bill entry form, provide the necessary information about the vendor, including the vendor’s name, address, and contact details. Ensuring accurate vendor details helps maintain precise records and facilitates communication.
- Enter Bill Details: Fill in the required bill information, such as the invoice number, bill date, due date, and payment terms. Specify the amount due, as well as any applicable discounts or taxes.
- Assign Accounts and Items: Categorize the bill by selecting the appropriate expense accounts and items. This step helps in accurately tracking expenses and generating useful reports for analysis and decision-making purposes.
- Review and Save: Before finalizing the bill entry, carefully review all the entered details for accuracy. Once verified, click on the “Save” or “Save and Close” button to save the bill.
How to Enter Bills in QuickBooks Desktop
QuickBooks Desktop offers comprehensive features for efficient bill management. Here’s a step-by-step guide on entering bills in QuickBooks Desktop:
- Launch QuickBooks Desktop: Double-click the QuickBooks Desktop icon on your computer to open the application.
- Access the Vendor Menu: From the top menu bar, navigate to the “Vendors” section and select “Enter Bills” from the drop-down menu.
- Choose the Vendor: In the “Enter Bills” window, select the appropriate vendor from the vendor list or add a new vendor if necessary. Maintaining an updated vendor list with accurate information streamlines the QuickBooks enter bills process.
- Enter Bill Information: Fill in all relevant details related to the bill, including the invoice number, bill date, due date, and terms. Specify the amount due, discounts, and taxes, if applicable.
- Assign Accounts and Items: Categorize the bill by assigning the relevant expense accounts and items. Properly categorizing bills ensures accurate expense tracking and simplifies the generation of financial reports.
- Review and Save: Thoroughly review the entered information to avoid any errors. Once you’ve reviewed everything, click on the “Save & Close” or “Save & New” button to save the bill.
Tips for Efficient QuickBooks Enter Bills
To enhance your bill entry process in QuickBooks and optimize your financial management, consider implementing the following tips:
- Regularly Update Vendor Information: Keep your vendor list up to date by maintaining accurate contact details and payment terms. This practice streamlines the bill entry process, prevents errors, and fosters strong vendor relationships.
- Utilize Recurring Bills: For bills with consistent amounts and due dates, set up recurring bills in QuickBooks. This feature automates the bill entry process, saving you time and effort. QuickBooks will automatically generate bills based on the established recurring schedule, reducing manual data entry.
- Link Bills to Expenses: When entering bills, make sure to link them directly to the corresponding expenses or accounts. This practice simplifies expense tracking and provides a clear financial overview. It allows you to monitor the impact of bills on specific expense categories and accurately assess your business’s financial health.
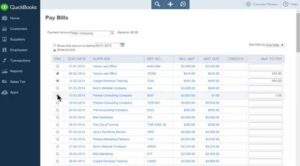
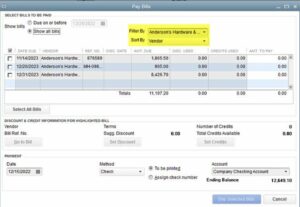
- Enable Online Bill Payments: Explore QuickBooks’ online bill payment feature, which allows you to pay bills directly through the software. Enabling this feature ensures timely payments, reduces manual effort, and minimizes the risk of missing due dates or incurring late fees.
- Take Advantage of Write Checks: In situations where you need to pay bills immediately, use the “Write Checks” feature in QuickBooks instead of entering bills. This method expedites the payment process, as it enables you to create checks directly from the software, specifying the payee and amount.
Conclusion – Quickbooks Enter Bills
Accurate and timely bill entry is crucial for maintaining financial transparency, tracking expenses, and managing cash flow effectively. QuickBooks offers intuitive features that simplify the bill entry process, whether you are using QuickBooks Online or QuickBooks Desktop. By following the detailed steps outlined in this guide and implementing the provided tips, you can optimize your QuickBooks enter bills workflow, track expenses efficiently, and ensure the smooth financial operation of your business.
Frequently Asked Questions
Q1: How do I enter bills for expenses that have already been paid in QuickBooks?
If you need to enter bills for expenses that have already been paid, QuickBooks provides a simple solution. Follow these steps:
- In QuickBooks, navigate to the “Vendors” menu and select “Enter Bills.”
- Fill in the necessary vendor and bill details, such as the vendor’s name, invoice number, and bill amount.
- Instead of entering the payment information, click on the “Mark as Paid” option or select the appropriate payment method.
- Choose the account from which the payment was made and enter the payment date.
- Review the entered information and click on “Save” to record the bill as already paid in QuickBooks.
Q2: Can I automate the process of entering recurring bills in QuickBooks?
Yes, QuickBooks offers a convenient feature called “Recurring Bills” that allows you to automate the entry of bills with consistent amounts and due dates. To set up recurring bills, follow these steps:
- In QuickBooks, navigate to the “Vendors” menu and select “Enter Bills.”
- Enter the necessary vendor and bill details for the recurring bill.
- Before saving the bill, click on the “Make Recurring” button or select the option to create a recurring bill.
- Configure the recurrence schedule, specifying the frequency (e.g., monthly, quarterly) and the start and end dates.
- Choose the number of days in advance you want QuickBooks to remind you about the upcoming bill.
- Review the recurring bill details and click on “Save” to set up the recurring bill in QuickBooks.
Q3: What should I do if I encounter an issue where I cannot enter bills in QuickBooks?
If you are unable to enter bills in QuickBooks, try the following troubleshooting steps:
- Ensure you have the necessary access and permissions to enter bills in QuickBooks. Check with your administrator or user settings to confirm that you have the required privileges.
- Update your QuickBooks software to the latest version. Sometimes, outdated software versions can cause issues with certain functionalities.
- Verify your internet connection. QuickBooks Online requires a stable internet connection for seamless functionality. If you’re experiencing connectivity issues, troubleshoot your internet connection or try accessing QuickBooks from a different device or network.
- Check for any error messages or notifications. QuickBooks may provide specific error codes or messages that can help identify the issue. Refer to QuickBooks support resources or contact customer support for further assistance.
- Consider clearing your browser cache and cookies. Over time, accumulated browser data can affect the performance of web-based QuickBooks. Clearing the cache and cookies can assist in resolving possible conflicts.
Q4: Can I enter bills directly through bank feeds in QuickBooks?
Yes, QuickBooks provides a feature called “Bank Feeds” that allows you to streamline the process of entering bills directly from your bank transactions. Follow these steps:
- Connect your bank accounts to QuickBooks and set up bank feeds.
- Review your bank transactions within the “Banking” or “Transactions” menu.
- Identify the transactions that represent bills or expenses.
- Select the appropriate transactions and categorize them as bills.
- QuickBooks will create a bill entry with the transaction details pre-populated.
- Verify the bill details, make any necessary adjustments, and save the bill.

