Are you looking for a hassle-free way to manage refunds in QuickBooks? Whether you need to issue refunds to customers or record refunds from vendors, QuickBooks makes it easy to handle all types of refunds. In this comprehensive guide, we will explore the process of entering, recording, categorizing, and issuing refunds in QuickBooks.
What is QuickBooks Refund?
QuickBooks is a popular accounting software that allows businesses to manage their finances with ease. Refunds are a common part of business operations, and QuickBooks makes it easy to handle refunds from customers and vendors. In QuickBooks, a refund is recorded as a negative transaction that offsets a previous transaction.
Benefits of QuickBooks Refund
QuickBooks refund provide several benefits for businesses that need to issue refunds to customers. Here are some of the benefits of using QuickBooks refund:
- Saves time: QuickBooks makes it easy to issue refunds, which can save you time compared to manually processing refunds.
- Improves accuracy: By recording QuickBooks refund, you can ensure accuracy in your financial records and reduce the risk of errors.
- Enhances customer satisfaction: Issuing refunds promptly and accurately can help improve customer satisfaction and maintain good customer relationships.
- Simplifies tracking: QuickBooks makes it easy to track refunds, so you can see the status of all refunds at a glance.
- Provides detailed reporting: QuickBooks provides detailed reporting on refunds, so you can see how much money has been refunded and to whom.
- Helps with budgeting: By tracking refunds in QuickBooks, you can easily factor them into your budget and financial planning.
- Facilitates tax preparation: QuickBooks refund are automatically recorded in the appropriate accounts, which can make tax preparation and manage QuickBooks balance sheet easier and less time-consuming.
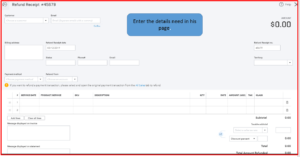
How to Enter Refunds in QuickBooks?
Entering QuickBooks refunds is a straightforward process. Here are the steps:
- From the QuickBooks homepage, click on the “+” icon in the top menu bar.
- Choose “Refund Receipt” from the drop-down menu.
- Choose the customer who is owed the refund from the “Choose a customer” dropdown menu.
- Enter the details of the refund, such as the refund date, refund amount, and the account you want to use to record the refund.
- To save and finish the refund transaction, click “Save and Close.”
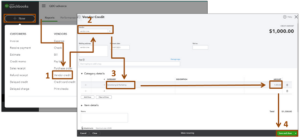
How to Record Refunds in QuickBooks?
Recording refunds in QuickBooks is essential for accurate financial reporting. Here’s how to record refunds in QuickBooks:
- Click the “+” icon in the top menu bar from the QuickBooks homepage.
- Select “Check” from the list of options.
- Choose the vendor or supplier who issued the refund from the “Choose a payee” dropdown menu.
- Enter the refund’s specifics, including the date, total, and account you want to use to record the refund.
- To save and close the refund transaction, click Save and Close.
How to Categorize Refunds in QuickBooks?
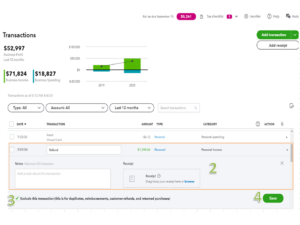
Categorizing refunds in QuickBooks is important for accurate financial reporting. Here are the steps to categorize QuickBooks refunds:
- The “Transactions” tab can be found in the left-hand menu on the QuickBooks homepage.
- Select “Refunds” from the list of options.
- Choose the refund you want to categorize.
- Click on the “Category” field and select the appropriate category for the refund.
- If you don’t see the appropriate category, click on “Add New” to create a new category.
- Enter a name for the new category and select the appropriate account to track it.
- Click “Save” to categorize the refund using the new category.
How to Issue Refund in QuickBooks?
The steps to issue refund in QuickBooks are given below:
- Click on the “Sales” tab in the left-hand menu on the QuickBooks homepage.
- Select “Customers” from the list of options.
- Choose the customer you want to issue a refund to.
- Click on the “Refund” button at the top of the customer’s transactions list.
- Enter the amount of the refund and the reason for the refund.
- Choose the appropriate account to track the refund.
- If you want to issue a partial refund, enter the specific amount you want to refund.
- Click “Save and close” to issue the refund and record it in QuickBooks.
Conclusion
In conclusion, QuickBooks refunds provide businesses with an efficient and accurate way to issue refunds to customers. By using QuickBooks to enter, record, categorize, and issue refunds, businesses can save time, improve accuracy, enhance customer satisfaction, simplify tracking, provide detailed reporting, help with budgeting, and facilitate tax preparation. Whether you need to issue a full or partial refund, QuickBooks offers a streamlined process that can help you manage your finances more effectively. By taking advantage of QuickBooks refund features, businesses can improve their financial management practices and maintain good customer relationships.
Frequently Asked Questions (FAQs)
Q.1 How long does it take to issue a refund in QuickBooks?
The time it takes to issue a refund in QuickBooks can vary depending on the payment method and your bank’s processing time. In general, refunds issued through QuickBooks can take 3-5 business days to process.
Q.2 Can I issue a partial refund in QuickBooks?
Yes, QuickBooks allows you to issue partial refunds to customers. When issuing a refund, simply enter the amount you want to refund in the appropriate field.
Q.3 Can I issue a refund for a payment that was made outside of QuickBooks?
Yes, you can issue a refund for a payment that was made outside of QuickBooks. Simply record the refund as you would for any other refund, and enter the appropriate payment information.

