Are you struggling to create an invoice in QuickBooks for your business? Whether you’re a freelancer or a small business owner, invoicing is a crucial aspect of your finances. QuickBooks, a popular accounting software, can help you streamline your invoicing process and keep track of your income. In this guide, we’ll take you through the steps of creating an invoice in QuickBooks.
What is QuickBooks Invoice?
QuickBooks Invoice is a feature in the QuickBooks accounting software that allows users to create an invoice in QuickBooks and send professional-looking invoices to their customers. QuickBooks Invoice makes it easy for businesses to track their sales and manage their QuickBooks cash flow. With QuickBooks Invoice, users can customize their invoices with their company logo, colors, and messaging. The software also allows users to add items, discounts, taxes, and other details to their invoices.
Once an invoice is created, users can send it to their customers via email or print it out and mail it. QuickBooks Invoice also allows users to track the status of their invoices, including when they have been viewed and paid. The software also provides users with reports on their invoicing activity, such as sales by customer and aging of accounts receivable.
Setting Up QuickBooks for Invoicing
Before you start create an invoice in QuickBooks, you need to set up your account properly.
- Sign up for QuickBooks: If you don’t have a QuickBooks account, you’ll need to sign up for one. You can choose between QuickBooks Online or QuickBooks Desktop, depending on your preferences.
- Connect your bank account: QuickBooks allows you to connect your bank account, credit card, or PayPal account, making it easier to track your income and expenses.
- Create your customer list: QuickBooks allows you to create a list of your customers and their information, making it easier to invoice them later.
- Set up your products and services: If you’re invoicing for products or services, you’ll need to set them up in QuickBooks. This will help you track your inventory and expenses.
How to Create an Invoice in QuickBooks Online?
Now that you’ve set up your QuickBooks account, you’re ready to create your first invoice. Here’s how to do it:
- Click on the “Invoicing” tab: Once you log in to your QuickBooks account, click on the “Invoicing” tab on the left-hand side of the screen.
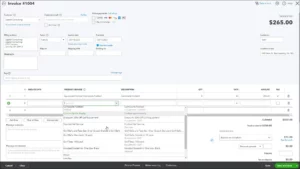
- To create an invoice in QuickBooks, click the green “Create Invoice” button in the right-hand corner.
- Select a customer: Choose the customer you want to invoice from your customer list.
- Add products or services: Add the products or services you’re invoicing for. You can choose from the products and services you’ve already set up in QuickBooks.
- Add payment terms: Specify your payment terms, including the due date and any late fees.
- Preview and send the invoice: Once you’ve added all the necessary information, preview your invoice to make sure everything looks correct. After that, click on “Save and Send” to email your invoice to your customer.
Customizing Your Invoices
QuickBooks allows you to customize your invoices to match your branding and preferences. Here are some customization options:
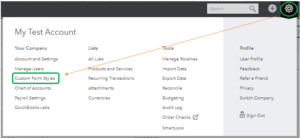
- Customize the invoice template: QuickBooks offers different invoice templates that you can choose from or customize. You can add your logo, change the color scheme, and choose the information you want to display on the invoice.
- Add a message: You can add a personalized message to your invoice, such as a thank you note or a promotional message.
- Add a discount: QuickBooks allows you to add a discount to your invoice, either as a percentage or a fixed amount.
- Add attachments: You can attach documents, such as receipts or contracts, to your invoice.
Managing Your Invoices
Once you’ve sent your invoices, it’s important to manage them properly to ensure timely payment and accurate records. Here are some ways you can manage and create an invoice in QuickBooks:
- View invoice history: QuickBooks keeps a record of all the invoices you’ve sent and their status, including whether they’ve been viewed or paid. You can view this history by clicking on the “Invoicing” tab and then selecting “All Sales.”
- Send reminders: QuickBooks allows you to send reminders for unpaid invoices. Normally, reminders are sent automatically, but you can also send them manually. To set up automatic reminders, go to the “Settings” menu, select “Automation,” and then select “Reminder Emails.” From there, you can set up the frequency and content of your reminders.
- Accept payments: QuickBooks allows you to accept payments directly from the invoice. You can set up payment options such as credit card, ACH, or PayPal. To accept payments, you’ll need to connect your payment provider to QuickBooks.
- Create reports: QuickBooks allows you to create reports to track your invoicing and payment history. You can create reports such as “Sales by Customer,” “Aging of Accounts Receivable,” and “Payment Received.”
Conclusion
Invoicing is a crucial aspect of your business finances, and QuickBooks can help you streamline the process. By setting up your account properly, create an invoice in QuickBooks, and managing them effectively, you can ensure timely payment and accurate records. With these tips, you’ll be able to create an invoice in QuickBooks like a pro.
Frequently Asked Questions (FAQs)
Q.1 Can I customize my invoices in QuickBooks?
Yes, QuickBooks allows you to customize your invoices with your company logo, colors, and messaging. You can also add custom fields to your invoices to include additional information.
Q.2 How do I set up automatic payment reminders in QuickBooks?
To set up automatic payment reminders in QuickBooks, go to the “Settings” menu and select “Automation.” From there, you can set up the frequency and content of your reminders.
Q.3 Can I accept online payments through QuickBooks Invoice?
Yes, QuickBooks allows you to accept online payments through various payment providers, such as credit card, ACH, or PayPal. You’ll need to connect your payment provider to QuickBooks to set up this feature.

