
QuickBooks Online is a powerful tool for managing your business’s finances, and custom fields can help you get even more out of this popular accounting software. In this article, we’ll take a closer look at what custom fields in QuickBooks online are, how to add them to invoices in QuickBooks, and where to access custom fields in QuickBooks online.
What Are Custom Fields in QuickBooks Online?
Custom fields are fields that you can add to various forms and lists within QuickBooks Online to track additional information about your business. They are customizable text fields that allow you to enter information specific to your business needs. You can add custom fields to invoices, estimates, sales receipts, purchase orders, customers, vendors, products and services, chart of accounts, and reports.
Why Use Custom Fields in QuickBooks Online?
Custom fields can help you track important information about your business that may not be included in the default QuickBooks Online forms and lists. For example, if you need to track a customer’s order number or a product’s serial number, you can add a custom field to the appropriate form or list.
Custom fields can also help you streamline your workflow by reducing the need for manual data entry or by making it easier to search for and filter specific information within QuickBooks Online.
How to Add Custom Fields to Invoices in QuickBooks Online?
Adding custom fields to your invoices in QuickBooks Online is a simple process that can be completed in just a few steps. Here’s how:
Adding a Single Custom Field
- Log in to QuickBooks Online and click on the Gear icon in the upper right-hand corner.
- To access the “Custom Form Styles,” go to the “Your Company” section and choose it.
- Click on the form style that you want to customize (e.g., “Invoice”).
- Click on the “Content” tab.
- Click on the section where you want to add the custom field (e.g., “Header”).
- Click on the “+” icon to add a new field.
- Select “Text Box” from the choices provided in the “Field Type” drop-down menu.
- Enter a label for the custom field (e.g., “Order Number”).
- Click “Done” to save the custom field.
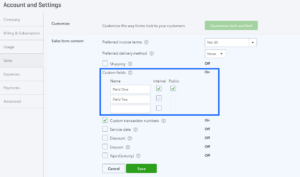
Adding Multiple Custom Fields in QuickBooks online
- Follow steps 1-4 from above.
- Click on the section where you want to add the custom fields in QuickBooks online (e.g., “Header”).
- Click on the “+” icon to add a new field.
- Choose the option “Text Box” from the drop-down menu for “Field Type”.
- Enter a label for the first custom field (e.g., “Order Number”).
- Click “Done” to save the first custom field.
- Repeat steps 3-6 to add additional custom fields.
- Click “Done” to save all of the custom fields.
Editing or Removing Custom Fields
- Log in to QuickBooks Account Online and click on the Gear icon in the upper right-hand corner.
- Select the “Custom Form Styles” option found in the “Your Company” section.
- Click on the form style that you want to edit or remove custom fields in QuickBooks online from (e.g., “Invoice”).
- Click on the “Content” tab.
- Find the custom field that you want to edit or remove.
- To edit the custom field, click on the pencil icon next to the field and make the desired changes. Click “Done” to save the changes.
- To remove the custom field, click on the trashcan icon next to the field and confirm the deletion.
Where to Access Custom Fields in QuickBooks Online
Once you’ve added custom fields to your forms and lists in QuickBooks Online, you may want to access that information later. Here’s where to access custom fields in QuickBooks Online:
Invoices
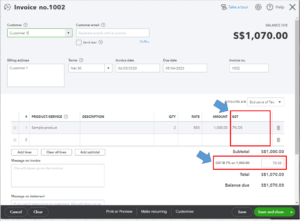
To access custom fields in invoices:
- Click on the “Sales” tab on the left-hand menu.
- Click on “Invoices.”
- Open the invoice that you want to view custom fields.
- Please move to the “Custom Fields” section located at the bottom of the invoice.
Estimates
To access custom fields in estimates:
- Click on the “Sales” tab on the left-hand menu.
- Click on “Estimates.”
- Open the estimate that you want to view custom fields for.
- Scroll down to the “Custom Fields” section at the bottom of the estimate.
Sales Receipts
To access custom fields in sales receipts:
- Click on the “Sales” tab on the left-hand menu.
- Click on “Sales Receipts.”
- Open the sales receipt that you want to view custom fields for.
- Scroll down to the “Custom Fields” section at the bottom of the sales receipt.
Purchase Orders
To access custom fields in purchase orders:
- Click on the “Expenses” tab on the left-hand menu.
- Click on “Purchase Orders.”
- Open the purchase order that you want to view custom fields for.
- Scroll down to the “Custom Fields” section at the bottom of the purchase order.
Customers
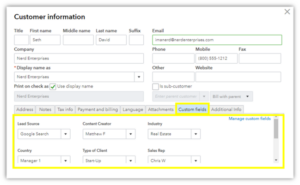
To access custom fields in customer records:
- Click on the “Sales” tab on the left-hand menu.
- Click on “Customers.”
- Open the customer record that you want to view custom fields for.
- Scroll down to the “Custom Fields” section at the bottom of the customer record.
Vendors
To access custom fields in vendor records:
- Click on the “Expenses” tab on the left-hand menu.
- Click on “Vendors.”
- Open the vendor record that you want to view custom fields.
- Scroll down to the “Custom Fields” section at the bottom of the vendor record.
Products and Services
To access custom fields in product and service records:
- Click on the “Sales” or “Expenses” tab on the left-hand menu, depending on whether the product or service is sold or purchased.
- Click on “Products and Services.”
- Open the product or service record that you want to view custom fields for.
- Scroll down to the “Custom Fields” section at the bottom of the product or service record.
Chart of Accounts
To access custom fields in the chart of accounts:
- Click on the Gear icon in the upper right-hand corner.
- Under the “Your Company” section, select “QuickBooks Chart of Accounts.”
- Find the account that you want to view custom fields for and click on it to open the account.
- You can find the “Custom Fields” section by scrolling to the bottom of the account page.
Once you’ve accessed the custom fields section, you can add new custom fields by clicking on the “Add Field” button. This will open a dialog box where you can enter the name of the custom field and choose the field type. QuickBooks Online supports a variety of custom field types, including text, checkbox, and date.
After you’ve added a custom field, it will appear in the custom fields section of the chart of accounts page. From here, you can edit or delete the custom field as needed. You can also use the custom field data to filter or sort your chart of accounts, making it easier to find specific accounts or information.
It’s important to keep in mind that custom fields in QuickBooks online are specific to each individual account, and cannot be applied across multiple accounts or to all accounts at once. However, by adding custom fields to your chart of accounts, you can create a more robust and customized accounting system that meets the unique needs of your business.
Conclusion
In conclusion, custom fields can be a powerful tool for businesses that want to track additional information beyond what is included in standard QuickBooks Online fields. By adding custom fields in QuickBooks to your invoices and chart of accounts, you can create a more detailed and customized accounting system that helps you stay organized and on top of your finances.
Frequently Asked Questions (FAQs)
Q1. How many custom fields can I add to an invoice in QuickBooks Online?
QuickBooks Online allows you to add up to three custom fields to an invoice. This includes both text and number fields, and you can choose to make them required or optional. If you need to track additional information beyond what is possible with three custom fields, you may want to consider using an app or add-on that integrates with QuickBooks Online.
Q2. Can I add custom fields to other types of transactions, such as bills or purchase orders?
Yes, you can add custom fields to a variety of transaction types in QuickBooks Online, including bills, purchase orders, and sales receipts. To do so, you’ll need to access the custom form styles feature, which allows you to create custom templates for different types of transactions. From there, you can add custom fields as needed to track additional information.
Q3. How can I use custom fields to track job or project information?
Custom fields can be a helpful way to track job or project information in QuickBooks Online. For example, you might create custom fields in QuickBooks online to track the name of a project, the project manager, or the project budget. To do so, you’ll need to add the custom fields to the appropriate transaction types (such as invoices or bills) and ensure that you consistently enter the relevant information. You can then use the custom fields to filter or sort your transactions by project, making it easier to track project expenses and revenue over time.

