If you are a small business owner looking to streamline your invoicing process, then QuickBooks Create Invoice Template can help you save time and improve the overall look of your invoices. In this article, we’ll walk you through the steps of creating a custom invoice template in QuickBooks and provide some tips to ensure your invoices are professional and effective.
Understanding the Importance of a Custom Invoice Template
Before we dive into the steps of QuickBooks Create Invoice Template, it’s important to understand why having a professional and customized invoice template is crucial for your business. Here are a few reasons why a custom invoice template is important:
- Professionalism: A professional-looking invoice can help you establish credibility with your clients and make a positive impression.
- Branding: Customizing your invoice template with your logo, colors, and fonts can help you reinforce your brand identity and stand out from your competition.
- Efficiency: By creating a custom invoice template, you can save time and streamline your invoicing process by eliminating the need to manually input the same information on every invoice.
How to Create Invoice Template in QuickBooks?
Now that you understand the how to create an invoice template in QuickBooks, let’s go over the steps to create one in QuickBooks:
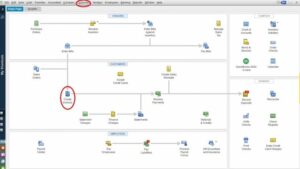
Step 1: Open QuickBooks and Go to the Invoice Customization Menu
Open QuickBooks and navigate to the “Customize Data Layout” menu. From there, select “Create an Invoice in QuickBooks” from the drop-down menu and click “Customize Data Layout.”
Step 2: Customize the Invoice Header
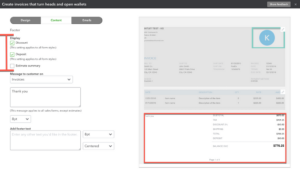
In the next window, you’ll see a preview of the invoice template. You can customize the header by adding your company logo, changing the font and color, and adding or removing fields.
Step 3: Customize the Invoice Body
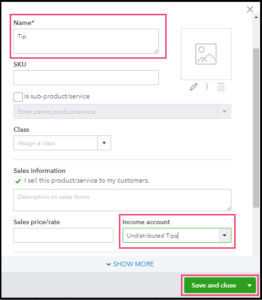
Next, you can customize the invoice body by adding or removing columns, changing the font and color, and adjusting the layout. It is also possible to add custom fields if necessary.
Step 4: Customize the Invoice Footer
Finally, you can customize the invoice footer by adding your payment terms, contact information, and any other important details.
Step 5: Save Your Custom Invoice Template
Once you’re happy with your custom invoice template, click “OK” to save it. You can then select your custom template when creating new invoices in QuickBooks.
Tips for Creating Effective Invoices
Now that you know how to create QuickBooks Create Invoice Template, here are a few tips to ensure your invoices are effective:
- Keep it simple: A cluttered invoice can be confusing and overwhelming. Stick to the essential information, such as the invoice date, due date, amount due, and payment options.
- Be specific: Provide detailed descriptions of the goods or services you provided, so there is no confusion about what is being billed.
- Use a professional tone: Use a polite and professional tone when addressing your clients. Avoid using overly casual language or slang.
- Make it easy to pay: Provide clear instructions on how to pay the invoice and offer multiple payment options, such as online payment or check.
Conclusion
QuickBooks Create Invoice Template can help you save time and improve the overall look of your invoices. By following the steps outlined in this article and incorporating some of our tips for creating effective invoices, you can streamline your invoicing process and make a positive impression on your clients.
Frequently Asked Questions (FAQs)
Q.1 How do I choose the right invoice template for my business?
Choosing the right invoice template for your business depends on several factors, such as your industry, the type of goods or services you provide, and your branding preferences. When selecting a template, consider the layout, colors, and fonts, and ensure that it aligns with your brand identity. Additionally, look for templates that include all the essential elements, such as the invoice date, due date, item description, quantity, and price.
Q.2 Can I customize the fields on my invoice template in QuickBooks?
Yes, you can customize the fields on your QuickBooks Create Invoice Template. When creating a custom template, you can add or remove fields, such as the customer’s shipping address, tax information, or payment terms. Additionally, you can choose the placement and formatting of each field to ensure that your invoice is clear and easy to read.
Q.3 How do I save my custom invoice template in QuickBooks?
To save your custom invoice template in QuickBooks, navigate to the “Customize Data Layout” menu and select “Invoice.” From there, you can customize the header, body, and footer of the invoice and click “OK” to save your changes. You can then select your custom template when creating new invoices in QuickBooks.

