
As a business owner, managing your finances is critical to the success of your enterprise. One of the essential aspects of managing your finances is managing your QuickBooks vendors credit. Vendor credits are credits that your vendors give you for overpayment, damaged goods, or other reasons. It is crucial to manage these vendor credits effectively to ensure that you are not losing money. QuickBooks is an accounting software that can help you manage your vendor credits effectively. In this article, we will discuss QuickBooks vendor credits, how to enter them, how to apply them, and how to pay your vendors in QuickBooks online.

What are QuickBooks Vendor Credit?
Vendor credit are credits that your vendors give you for overpayment, damaged goods, or other reasons. QuickBooks vendor credits are a way to track these credits in your QuickBooks account. You can use QuickBooks vendor credit to offset future purchases from that vendor, and they will be applied automatically to any new bills from that vendor.
Benefits of QuickBooks Vendor Credit
The benefits of using QuickBooks Vendor Credit are given below:
- Improved cash flow management: Vendor credits can help you better manage your QuickBooks cash flow by reducing the amount of money you owe to vendors.
- Accurate record-keeping: QuickBooks Vendor Credit provide an easy and efficient way to track and manage credits owed to your vendors.
- Easy tracking of vendor refunds: QuickBooks Vendor Credit allows you to easily track any refunds owed to your vendors, ensuring you receive the correct amount.
- Enhanced vendor relationships: By accurately tracking and managing vendor credits, you can build stronger relationships with your vendors, improving communication and trust.
- Increased efficiency: QuickBooks Vendor Credit streamlines the process of entering, tracking, and applying vendor credits, reducing the time and effort required for these tasks.
- Reduced errors: Automating the process of tracking and managing vendor credits reduces the chance of errors, such as duplicate entries or incorrect amounts.
- Increased financial visibility: QuickBooks Vendor Credit provides real-time financial data, giving you greater visibility into your financial situation and helping you make informed business decisions.
- Improved financial reporting: QuickBooks Vendor Credit simplifies financial reporting, providing accurate and manage QuickBooks balance sheet or comprehensive reports on vendor credits owed and paid.
- Better compliance: QuickBooks Vendor Credit helps ensure compliance with tax laws and accounting regulations, reducing the risk of penalties and legal issues.
- Cost savings: By accurately tracking and managing vendor credits, QuickBooks can help you save money by avoiding duplicate payments, overpayments, and missed credits
How to Enter a Vendor Credit in QuickBooks?
Entering a vendor credit in QuickBooks is a simple process. Follow these steps:
- Click on the “+ New” button on the home screen of QuickBooks.
- Select “Vendor Credit” from the drop-down menu under the “Vendors” column.
- Enter the vendor name, the date of the credit, and the credit amount in the fields provided.
- Choose the account that the credit should be applied to from the “Account” drop-down menu.
- Save the vendor credit by clicking on the “Save and Close” button.
How to Apply Vendor Credit in QuickBooks Online?
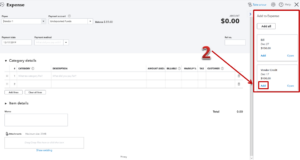
Applying for vendor credit in QuickBooks online is a straightforward process. Follow these steps:
- Click on the “+ New” button on the home screen of QuickBooks online.
- Select “Expense” or “Check” from the drop-down menu under the “Vendors” column.
- Enter the vendor name and the amount of the bill or check.
- Choose the vendor credit that you want to apply from the “Credits” section.
- Save the expense or check by clicking on the “Save and Close” button.
How to Change a Customer to Vendor in QuickBooks Online?
If you have accidentally set up a customer as a vendor in QuickBooks online, you can easily change it. Follow these steps:
- Click on the “Sales” tab on the home screen of QuickBooks online.
- Select the customer that you want to change to a vendor.
- Click on the “Edit” button next to the customer name.
- Change the customer type from “Customer” to “Vendor.”
- Save the changes by clicking on the “Save” button.
How to Pay Vendors in QuickBooks Online?
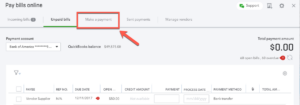
Paying vendors in QuickBooks online is a simple process. Follow these steps:
- Click on the “+ New” button on the home screen of QuickBooks online.
- Select “Pay Bills” from the drop-down menu under the “Vendors” column.
- Choose the vendor that you want to pay from the list provided.
- Enter the payment amount and the payment date in the fields provided.
- Choose the payment method from the drop-down menu under the “Payment Account” column.
- Click “Save and Close” to save the payment.
Conclusion
In conclusion, QuickBooks is an essential tool for managing your vendor credits and overall finances. By using the software to enter and apply vendor credits, pay your vendors, and even change customer types, you can save time and money in the long run. Remember to keep track of your QuickBooks vendor credit and stay on top of your finances to ensure the success of your business. If you have any questions or concerns, reach out to contacting QuickBooks support for assistance.
Frequently Asked Questions (FAQs)
Q.1 Can I apply a vendor credit to a specific bill in QuickBooks?
Yes, you can apply a vendor credit to a specific bill in QuickBooks by going to the “Expenses” tab, selecting “Vendors,” and then clicking on “Pay Bills.” You will then need to select the vendor that you want to pay, and the bill that you want to apply the credit to. You can then select the vendor credit from the list of available credits, and the amount will be applied to the selected bill.
Q.2 How can I track my vendor credits in QuickBooks?
You can track your vendor credits in QuickBooks by running a vendor balance detail report or a vendor balance summary report. These reports will show you the amount of vendor credits that you have received, as well as any outstanding bills that the credits can be applied to. You can also view vendor credits by going to the “Expenses” tab, selecting “Vendors,” and then clicking on “Vendor Credits.”
Q.3 How do I edit a vendor credit in QuickBooks?
To edit a vendor credit in QuickBooks, you need to go to the “Expenses” tab, select “Vendors,” and then click on “Vendor Credits.” You will then need to find the credit that you want to edit and click on “Edit.” You can then make any necessary changes to the credit, such as the amount or the memo, and then click on “Save and Close.”

