Are you looking for ways to manage vendor refunds effectively in QuickBooks? If the answer is yes, you’ve found the proper site. In this article, we will cover everything you need to know about QuickBooks vendor refund, including what it is, how to process it, and some common FAQs.
What is a QuickBooks Vendor Refund?
A Vendor Refund n QuickBooks is a feature of the QuickBooks accounting software that allows users to quickly and easily issue refunds to vendors. This feature allows users to enter the vendor’s name, the amount of the refund, and the date of the refund. The refund is then recorded in the vendor’s account and the user’s account. This feature is especially useful for businesses that need to quickly and accurately issue refunds to vendors for returned goods or services. A vendor refund in QuickBooks refers to a payment that is returned to you by a vendor for an overpayment or an incorrect payment made previously. The refund can either be in the form of a credit memo or a check, depending on how you prefer to receive it.
Benefits of QuickBooks Vendor Refund
1. Automatically Creates and Sends Refunds:
QuickBooks Vendor Refund enables users to quickly and easily create and send refunds to their vendors. This eliminates manual processes and eliminates the need to manually enter data into the system.
2. Streamlines Refunds:
Vendor Refund in QuickBooks streamlines the refund process by enabling users to create and send refunds with ease. This helps users save time, effort, and money by eliminating manual processes.
3. Improves Cash Flow:
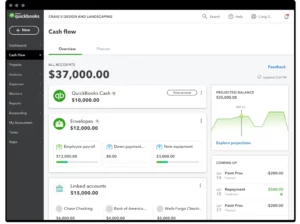
By automating the refund process, QuickBooks Vendor Refund helps improve QuickBooks cash flow by reducing the time it takes to receive refunds from vendors. This helps businesses improve their bottom line and stay ahead of competition.
4. Automates Record Keeping:
QuickBooks Vendor Refund automatically records all refund transactions and transactions in a single database. This helps users to quickly and easily access information about refunds and transactions in real time.
5. Reduces Risk of Fraud:
Vendor Refund in QuickBooks eliminates the risks associated with manual refund processes. By automating the process, users can rest assured that their refunds are secure and accurate.
6. Easily Tracks Refunds:
QuickBooks Vendor Refund enables users to easily track and manage their refunds. This helps users to ensure that refunds are sent out in a timely manner and that they are accurate.
7. Customizable:
QuickBooks Vendor Refund offers a customizable platform so users can tailor their refunds to meet their specific needs. This helps businesses to create refunds that are tailored to their unique business needs.
8. Reports:
Vendor Refund in QuickBooks enables users to generate reports on refunds. This helps users to analyze the performance of their refunds and make informed decisions about refund policies.
9. Secure Payments:
QuickBooks Vendor Refund offers secure payment options, which helps users to ensure that their refunds are sent out securely and accurately. This helps businesses to protect their funds and maintain the trust of their vendors.
How to Process a QuickBooks Vendor Refund?
Processing a vendor refund in QuickBooks involves the following steps:
Step 1: Enter the Refund
To enter a refund in QuickBooks, follow these steps:
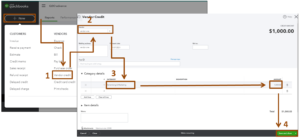
- Open QuickBooks and select the “+” icon.
- Choose “Vendor Credit” under the Vendors section.
- Select the vendor who issued the refund from the “Choose a vendor” drop-down list.
- Enter the amount of the refund in the “Amount” field.
- Choose the account to which you want to apply the refund.
Step 2: Apply the Refund
To apply the refund to an invoice, follow these steps:
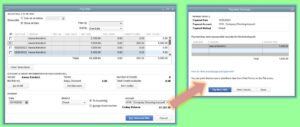
- Open the invoice that was overpaid or incorrectly paid.
- At the bottom of the invoice, click the “Set Credits” link.
- Select the credit memo that was created for the refund.
- Verify that the correct amount is being applied to the invoice.
Step 3: Review the Refund
After applying for the refund, you should review it to make sure that it was processed correctly. To review the refund, follow these steps:
- Open the vendor’s account in QuickBooks.
- Select the “Transactions” tab.
- Look for the vendor credit that was created an invoice in QuickBooks for the refund.
- Verify that the credit was applied to the correct invoice or deposit.
How to QuickBooks Vendor Refund for Overpayment?
To process a QuickBooks Vendor Refund for overpayment, the points are given below:
- Firstly, You will need to open the Vendor Center.
- Then, Select the Vendor that you want to issue the refund to.
- Now, you can enter the amount of the refund and click “OK” to complete the transaction.
- You can also view the status of the refund in the “Payments & Refunds” tab of the Vendor Center.
Conclusion:
In conclusion, QuickBooks Vendor Refund is that it helps to ensure accurate and timely payments to vendors, eliminates the need for manual checks, simplifies the refund process and reduces the time and effort needed to process vendor refunds. Additionally, it can also help businesses save resources and be more efficient by streamlining the workflow.
Frequently Asked Questions (FAQs)
Q.1 Can I track the status of a vendor refund in QuickBooks?
Yes, you can track the status of a vendor refund in QuickBooks. When you record a vendor refund, QuickBooks automatically creates a credit memo for the vendor. You can view the credit memo by going to the “Vendors” menu and selecting “Vendor Center.” Select the vendor, and then click on the “Transactions” tab. The credit memo will be listed there.
Q.2 How do I apply a vendor refund to an open bill in QuickBooks?
To apply a vendor refund to an open bill in QuickBooks, go to the “Vendors” menu and select “Pay Bills.” Select the bill that you want to apply the refund to, and then click on the “Set Credits” button. Select the credit memo that represents the refund, and then click on “Done.” QuickBooks will apply the refund to the bill.
Q.3 Can I issue a QuickBooks vendor refund check?
Yes, you can issue a QuickBooks vendor refund check. To do so, go to the “Vendors” menu and select “Pay Bills.” Select the vendor that you want to issue the refund check to, and then enter the amount of the refund. Select “Check” as the payment method, and then click on “Pay Selected Bills.” QuickBooks will generate a refund check that you can print and mail to the vendor.

