
If you are using QuickBooks, you might sometimes need to change your beginning balance. This can happen if you made an error when entering your opening balance or if you need to adjust it for some reason. In this article, we will provide you with a step-by-step guide on how to change beginning balance in QuickBooks.
Understanding Beginning Balance
Before we dive into the process of changing beginning balance, let us first understand what it means. The beginning balance is the amount of money in your account at the start of your fiscal year or when you first created your account in QuickBooks. It is the sum of all the transactions that occurred before your first transaction in QuickBooks.
When to Change Beginning Balance?
There are several scenarios where you might need to change your beginning balance in QuickBooks. These include:
- Entering an incorrect opening balance when setting up your account.
- Changing your accounting method from cash to accrual or vice versa.
- Merging two or more accounts.
- Adding a new account or deleting an account.
- Reconciling your account and finding an error in the beginning balance.
Guide to Changing Beginning Balance in QuickBooks
To change your beginning balance in QuickBooks, follow these simple steps:
Step 1: Backup your data
Before you make any changes to your beginning balance in QuickBooks, it is essential to create a backup of your data. This will ensure that you can restore your data in case anything goes wrong during the process.
Step 2: Check your account history
Before you can change your beginning balance, you need to check your account history to ensure that all the transactions are accurate and up-to-date. You can do this by going to the “Lists” menu, selecting “Chart of Accounts,” and then double-clicking on the account that you want to change the beginning balance for.
Step 3: Make a journal entry
To change your beginning balance, you need to create a QuickBooks journal entry. A journal entry is a way to adjust your account balance without affecting your bank account. You can do this by going to the “Company” menu, selecting “Make General Journal Entries,” and then filling out the necessary information.
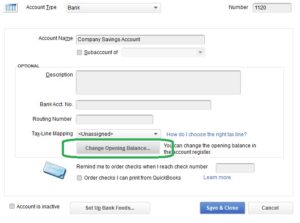
Step 4: Adjust the opening balance
Once you have created a journal entry, you need to adjust the opening balance. To do this, go to the “Lists” menu, select “Chart of Accounts,” and then double-click on the account that you want to change the beginning balance for. Next, select the “Edit Account” button and then change the opening balance to the new balance.
Step 5: Verify the changes
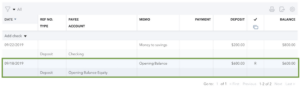
After you have adjusted the opening balance, you need to verify the changes to ensure that everything is accurate. You can do this by running a balance sheet report and checking that the balance matches the new opening balance that you have entered.
Tips for Changing Beginning Balance
Some tips to keep in mind when changing your beginning balance in QuickBooks:
- Before making any changes, make a backup of your data.
- Double-check your account history to ensure that all transactions are accurate and up-to-date.
- Make sure to create a journal entry to adjust your account balance.
- Verify your changes by running a balance sheet report.
- Consult with an accountant if you are unsure about any aspect of changing your beginning balance.
How to Change Beginning Balance in QuickBooks Online Reconciliation?
The steps to how to change beginning balance in QuickBooks Online reconciliation are given below:
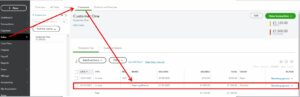
- Log in to your QuickBooks Online account and navigate to the “Accounting” menu.
- Select the “Reconcile” option under the “Tools” section.
- Choose the account that you want to reconcile and select the “Resume reconciling” button.
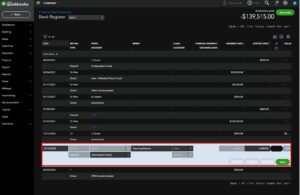
- Click on the “Edit info” button located at the top of the screen.
- Update the beginning balance by entering the correct amount in the “Beginning balance” field.
- Save the changes by clicking on the “Save” button.
- Continue reconciling your account as normal by following the prompts and making adjustments as necessary.
Conclusion
Changing your beginning balance in QuickBooks is a straightforward process if you follow the steps outlined in this article. Always remember to back up your data before making any changes and to double-check your account history to ensure that all transactions are accurate and up-to-date. If you follow these tips, you can easily adjust your beginning balance in QuickBooks without any issues.
Frequently Asked Questions (FAQs)
Q.1 How do I create a journal entry in QuickBooks?
To create a journal entry in QuickBooks, go to the “Company” menu and select “Make General Journal Entries.” Then, fill out the necessary information such as the date, account, and amount. Once you’re done, save the journal entry.
Q.2 How do I adjust the opening balance in QuickBooks?
To adjust the opening balance in QuickBooks, go to the “Lists” menu, select “QuickBooks Chart of Accounts,” and then double-click on the account that you want to change the beginning balance for. Next, select the “Edit Account” button and then change the opening balance to the new balance.
Q.3 What happens to my transactions if I change my beginning balance?
If you change your beginning balance, it can affect your financial statements and all the transactions that occurred before the new beginning balance. QuickBooks will adjust the balance of the account based on the journal entry that you created.
Q.4 Can I undo a beginning balance adjustment in QuickBooks?
Yes, you can undo a beginning balance adjustment in QuickBooks. Simply go to the “Lists” menu, select “Chart of Accounts,” and then double-click on the account that you want to undo the adjustment for. Next, select the “Edit Account” button and then change the opening balance back to the original balance.

